2008 | Jailbreak iPhone, iPod Touch, iPad - Part 4 Skip to content

Jailbreak iPhone, iPod Touch, iPad

новости про джейлбрейк iPhone, iPod Touch и iPad

Archive

Archive for 2008

202 iPhones firmware 2.0.2 is out

Apple just released new firmware for iPhone – version 2.0.2. As usual, all the company mentioned was that the update includes “Bug fixes.”

Notes on the release follow:

  • No new settings appear to have been included.
  • Some users report faster browsing, though this may be due to cleared cache.
  • Typing lag may be reduced.
  • No consensus on improved 3G connectivity.
  • iPod Touch firmware 2.0.2 also released.

But as always, do not update until we get word on a jailbreak.

Links for firmware downloads: iPhone 3G 2.0.2old iPhone 2.0.2.

quickpwn03 QuickPwn Beta

DevTeam created a quick solution for jailbreaking an iPhone. It is called QuickPwn. It is in beta, so be careful. It will allow you to pwn (jailbreak) your device very quickly without restoring!

Who should use this tool? This is for those that are not planning to restore. It’s not clear what the activation state is after the process therefore, I only recommend this for those that have a contract carrier or an unlocked phone already.

If you are on a stock device and using AT&T or a contract carrier, this is the perfect jailbreak for you. You will not lose your contacts or have to do any backups. Finally, if you are going to restore anyway, especially if you need to unlock a 2g, you may as well use winpwn or such.

Currently QuickPwn requires your device to be running version 2.0.1 of the iPhone/iPod firmware. And it runs only on Windows. This requirement will change in a subsequent release.

You can download it here.

PwnageTool 2.0.2 released just a day ago. And now WinPwn – iPhone jailbreaker and unlocker for windows is avaliable. The main new feature – it supports firmware 2.0.1.

Download 2.0.0.4: [Rapidshare.com] [Rapidshare.de]

Download firmwares: iPhone 1.1.4, 2.0, 2.0.1, iPhone 3G 2.0, 2.0.1

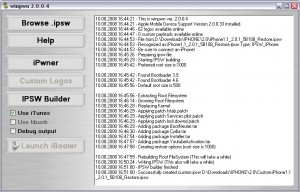
winpwn2004 2 300x192 WinPwn 2.0.0.4 with support of 2.0.1 firmware

2.0.0.4 features:

  • Support for both 1.1.4, 2.0, 2.0.1
  • Root partition resize support
  • Installer support
  • Support for WinXP and Vista 32/64bit.

Notes are as usual:

  • You MUST do a full uninstall of winpwn before installing the new version
  • Make sure you have the latest version of iTunes (from 7.7)
  • WinPwn uses 300MB of ram at peak due to the ipsw being extracted in memory
  • You must first click browse and load an IPSW to use WinPwn (i thought this was clear)
  • For 2.0 only the *5A347_Restore.ipsw files are valid. The 345 image will not work
  • If you see Failed to load image catalog/payload catalog, this is fine and won’t cause problems
  • If you already have service with AT&T do not activate or install Youtube Fix
  • As usual jailbreak for iPhone and iPhone 3G, unlock only for iPhone.
  • It is recommended to use at least 550mb partition size to accommodate a space issue that causes some folks errors such as “the ipsw failed to create”.

How to:

  1. First create a custom IPSW using the IPSW Builder (original are here: iPhone 1.1.4, 2.0, 2.0.1, iPhone 3G 2.0, 2.0.1).
  2. Bootloader Images: 3.9 and 4.6 in it here or here.
  3. Click “Ipwner” and browse for the custom IPSW that you just created. This will pwn itunes and allow you to flash
  4. Custom IPSW files via DFU mode
  5. Once you have pwned Itunes, put your phone into DFU mode. If you don’t know how to do this click Here.
  6. Once you are in DFU mode Itunes will pop up and then you can hold shift and click restore and browse to your custom IPSW file.

pwnage PwnageTool 2.0.2 is avaliable

PwnageTool 2.0.2 is out. It will support new firmware 2.0.1. It will jailbreak and unlock the old iPhone and jailbreak new iPhone 3G. Here are the download links:

Installer 4 Beta is included, it is added in any mode by default.  The main installer package management interface within PwnageTool isn’t enabled yet, and will report that installer.app isn’t available, but the actual Installer.app package is added as a default option in both modes.

The latest Cydia is also enabled by default. We recommend to use Cydia, not Installer.

Bad news is that it is still not avaliable. DevTeam postponed their release. The good news is that version 2.0.2 will jailbreak 2.0.1 fimware (and unlock 2.0.1 for old iPhone) and have both Cydia and Installer 4 included. Stay tuned, the release will be in couple days.

201 New firmware 2.0.1

The main purpose is bug fixing. Many applications work faster. Here is the list of changes:

  • Drag an app icon across multiple pages in one motion, rather than having to drag it, drop it, pick it up again and drag it over to next page, and repeat.
  • Contacts are now more responsive.
  • Backup is much faster.
  • Apple may have changed the calibration of the iPhone’s reception “bars” while connected to a 3G network to reflect a stronger signal than before.
  • Keypad loads quicker.
  • Screen rotation in Safari appears to be smoother.
  • Some apps may ask to be updated after the firmware upgrade.
  • SMS typing faster.
  • Google Apps works faster.
  • Netshare still works (for those who use it).
  • Works with iPod.
  • Multimedia content is kept after update.
  • No Support from Pwnage and WinPwn. If you update you’ll loose unlock and jailbreak.

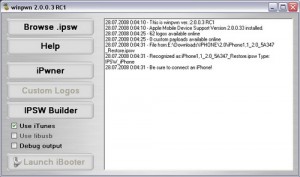
winpwn20031 300x177 WinPwn 2.5 soon

Developer of WinPwn (curent version is 2.0.0.3), IPhone unlocking and jailbreaking tool for Windows, announced today, that new version 2.5 will be released soon. Not much new features, mostely bugfixes.

“New WinPwn is being developed which will be a lot easier to use and should help a lot of people having issues.”

main mail 235x300 Mail app crashing on 2.0? There is a solution.

Is your mail crashing on 2.0 firmware?

This is generally caused after syncing your backup. This has nothing to do with jailbreaking or not. However, the fix for it is simple and is part of a jailbreak. The issue is that after syncing your backup, your mail folder is owned by root and your mail app running as user mobile does not have permissions to access it. You can fix it in SSH. But I also added a button in BossPrefs to solve it.

Step 1:Jailbreak your device

Step 2: Install BossPrefs from Cydia

Step 3: Tap “more”

Step 4: Tap “Fix User Dir Permissions”

Step 5: Sometimes, not always, you will need to load settings and reenter your mail passwords.

via sleepers.net

iphone 3g tethering Get internet on a desktop or notebook through IPhone 3G

Thanks to Dev Team and the porting work of Jay Freeman as well as the authors of 3Proxy, it is now possible to “tether” your iPhone 3G and use its Internet connection on your laptop.

Warning – Tethering your iPhone is against the iPhone data plan terms. AT&T could slap you with huge fees if you overuse this. I recommend only using it during emergencies.

Here is a basic plan (by the way, this should work for old IPhone also):

  • Jailbreak your iPhone 3G
  • Install 3Proxy and Terminal
  • Create an ad-hoc Wi-fi network using your laptop
  • Join the network with your iPhone
  • Find the iPhone’s IP address
  • Open Terminal and run the proxy program
  • Open Safari on your iPhone and open a web page
  • Configure your browser to use the proxy

Later we’ll discuss it with more details.

Step 1: Jailbreak your iPhone

Just download PWNageTool 2.0. Run it and follow the instructions. Make sure to add Cydia, when asked.

Step 2: Install 3Proxy and Terminal

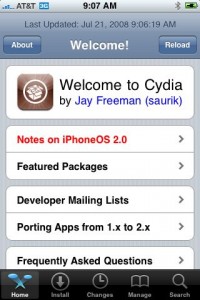
During the jailbreak, Cydia should have appeared on one of your app pages: use it and let Cydia load and self-update.

creationsnet 3428 200x300 Get internet on a desktop or notebook through IPhone 3G

Then head to Install, All Packages, then find MobileTerminal and 3Proxy (3Proxy is at the bottom). Install both and hit your Home button. Your phone will restart and you’ll see Terminal installed on your home screen. 3Proxy isn’t a GUI app and as such won’t have an icon.

Step 3: Create an ad-hoc Wifi network using your laptop

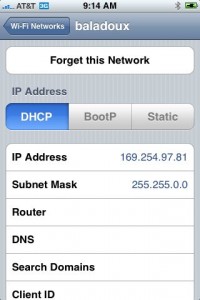
Using whatever wireless software suite you have, create an ad-hoc network. On a Mac it’s in the Airport menu, under “Create network…”. Name it something inconspicuous. I called mine “baladoux”. On your iPhone, join the ad-hoc network.

Step 4: Find your iPhone’s IP address

Then, hit the blue arrow next to it, and wait for your IP address to show up:

creationsnet 3430 200x300 Get internet on a desktop or notebook through IPhone 3G

Memorize (or write down) this IP address. You will need it later.

Step 5: Open Terminal and run the proxy program

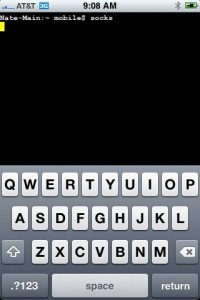
Simple enough. Open Terminal, type “socks” and hit return.

creationsnet 3431 200x300 Get internet on a desktop or notebook through IPhone 3G

Nothing will appear to happen, but the SOCKS server will be running. You can hit the home button to push Terminal to the background (remember to terminate it later, by switching back to Terminal and holding the Home button until it closes).

Step 6: Open Safari on the iPhone and open a web page

Any page will do. I recommend http://jailbreak-iphone.ru

This step is important. The page will take a while to load. When Safari realizes it can’t get to the Internet using the ad-hoc Wifi, it will do some internal magic to switch back to 3G for Internet while still on your ad-hoc network. That lets the proxy do its thing.

Step 7: Configure your browser

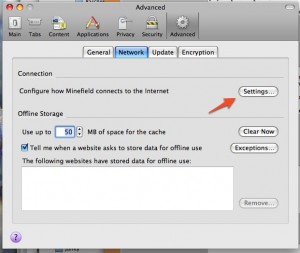
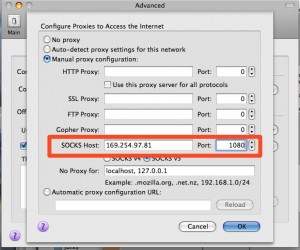
In Firefox, head to Preferences, and under Advanced, Network, hit Settings:

creationsnet 3433 300x253 Get internet on a desktop or notebook through IPhone 3G

Then, fill in the iPhone’s IP address (which you memorized earlier) into the SOCKS Host field, and put 1080 as the port number. Make sure all other proxy fields are blank and/or 0 as shown:

creationsnet 3434 300x250 Get internet on a desktop or notebook through IPhone 3G

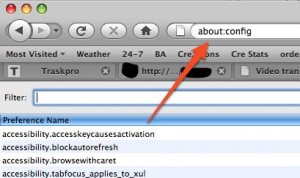
Then, since the proxy doesn’t forward DNS, you will also have to change an advanced option in Firefox. In the Firefox URL bar, enter “about:config” and hit Enter

creationsnet 3435 300x178 Get internet on a desktop or notebook through IPhone 3G

In Filter, type “socks” and then double-click “network.proxy.socks_remote_dns” to make its value “true”.

That should be all you need! Firefox should be able to browse the Internet through your iPhone’s 3G connection.

Tethering costs a lot of battery life on the iPhone so make sure you have it plugged in. When you’re done, make sure to quit Terminal by opening it back up and pressing and holding the Home button until it quits.

Thanks to cre.ations.net for this tutorial.