SSH | Jailbreak iPhone, iPod Touch, iPad - Part 2 Skip to content

Jailbreak iPhone, iPod Touch, iPad

новости про джейлбрейк iPhone, iPod Touch и iPad

Archive

Tag: SSH

HDR iPhone 3 3GS Check out HDR photos on iPhone 3G or 3GS!

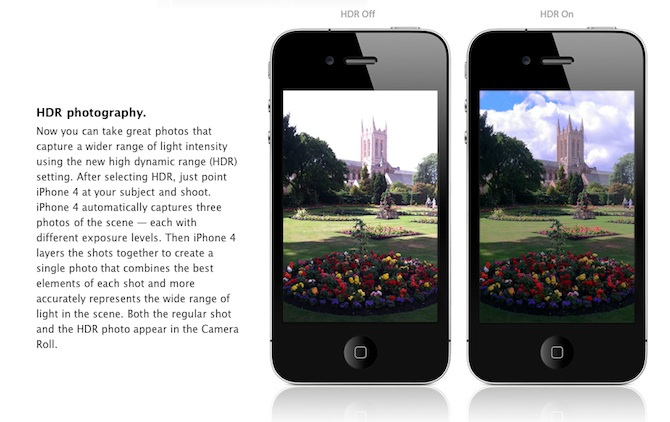
Are you looking forward to add a very popular HDR feature to your old iPhone? Do not worry! If you have a jailbroken (or ready to jailbreak) iPhone 3GS or 3G that runs on iOS 4.1, you can enable HDR photos. Here is a quick tutorial:

  • Make certain that you’ve installed OpenSSH via Cydia. When the application is installed, you’ll see SSH on your iPhone 3GS or 3G (it is recommended to use the «passwd» command to change your password from the standard «alpine»)
  • If you have an iPhone 3G, save the file, which is in / System/Library/CoreServices/SpringBoard.app/N82AP.plist
  • If you have an iPhone 3GS, save the file located at /System/Library/CoreServices/SpringBoard.app/N88AP.plist
  • Add a key «hdr-image-capture» with the “true” value
  • Save the file and use SSH to change a copy on your device with the modified version
  • Restart the SpringBoard or reboot your device. Now you’ve got access to the HDR settings in the application of your camera.
via

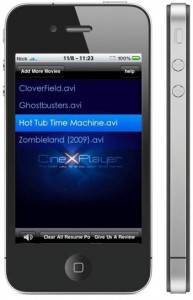
VerizoniPhone4 193x300 Play Xvid AVI Videos on iPhone and iPod Touch Right Now!Can not wait for the official release? Do you want to get CineXPlayer for iPad on your iPhone and iPod touch right now? For those of you who do not know, CineXPlayer is an iPad application that allows you to download Xvid AVI files using iTunes, so you can easily reproduce the format that Apple won’t. Because the developer has not invented version of the application for the iPhone, the hacker decided to do everything by himself.
It is a complete step by step tutorial on how to install it on your iPhone or iPod touch available here. You just need to jailbreak these devices, because the process involves SSH (SSH program for secure file sharing on the network) to access the iPhone, but it’s worth it if you want to get it right now!

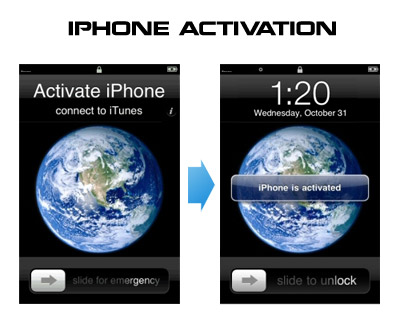
iphone activate HowTo activate iPhone without original SIM card

Having problems activating your iPhone? Don’t have original SIM-card? Cannot get passed emergency unlock screen? We have a solution:

If you have iPhone 3G, just use redsn0w to jailbreak and hactivate. If you have iPhone 3GS or iPhone 4 follow these instructions:

If you are already Jailbroken:

So you have an iPhone with iOS 4.0, but don’t have the original SIM and stuck on the Emergency Call Screen:

  1. Download ifunbox software (download link)
  2. Run ifunbox software and sync with phone
  3. Go to /private/var/root/Library/, delete original lockdown folder and put this lockdown folder after you extract it from the zip file
  4. Restart phone

If you are not jailbroken

Sherif Hashim discovered that you can activate your iPhone 4, iPhone 3GS or even iPhone 3G without the original carrier SIM card. You need a “phonebook sim card” or 02 simcard. You can buy these type of sim at radioshack, bestbuy or other mobile electronics store (for example here).

Once you get passed the Emergency Call screen, connect to Wifi, jailbreak using JailbreakMe.com and unlock using ultrasn0w. Once that is complete you should be passed activation and unlocked (able to use any sim). If you get a different simcard error, do the following final step:

  1. Download ifunbox software (download link)
  2. Run ifunbox software and sync with phone
  3. Go to /private/var/root/Library/, delete original lockdown folder and put this lockdown folder after you extract it from the zip file
  4. Restart phone

If you have itunes invalid response problem:

  1. Connect to wifi and ssh to your phone (via winscp, putty, terminal, etc).
  2. Navigate to your lockdown folder (/private/var/root/Library/).
  3. Delete pair_records folder
  4. Reconnect the cable and see that your invalid response problem is gone.

If you bought your iPhone 4 on ebay you will need the official sim (at&t) or a universal sim, like ones you can grab at bestbuy for $10 this will get you passed Emergency Screen.

via jailbreakmatrix and gsmhosting

spirit jailbreak How To Recover Deleted Photos After Spirit Jailbreak

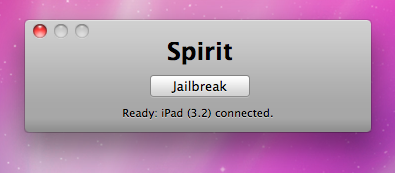
The first release of Spirit had a bug that accidently could delete all of your photos from the device that was jailbroken. If you have a backup which you made before jailbreaking your iPhone/iPod Touch/iPad, here is a quick guide how to recover deleted photos.

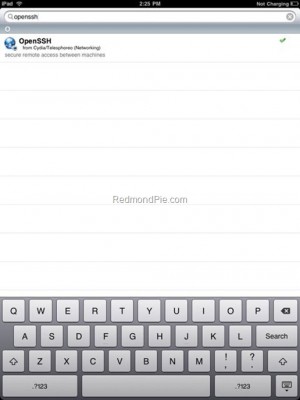
1. Open Cydia and search for “OpenSSH” and then install it. Reboot your device.

OpenSSHoniPad 300x400 How To Recover Deleted Photos After Spirit Jailbreak

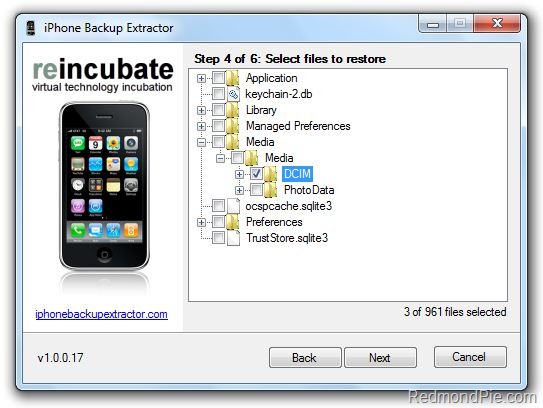
2. Download and then install iPhone Backup Extractor.

3. Run iPhone BackUp Extractor. Select your last backup (that was made before jailbreak)

4. Navigate to Media/Media and select DCIM folder. Click “Next” and program will save the files locally.

iPhoneBackupExtractor1 How To Recover Deleted Photos After Spirit Jailbreak

5. Download and then istall WinSCP for Windows or Cyberduck for Mac . Open it and enter the following data to login to your device.

WinSCP for Windows

  • Hostname: The IP address of your device. (Settings –> WiFi –> <Your Network Name>)
  • Protocol: SCP
  • User name: root
  • Password: alpine

WinSCP

Cyberduck for Mac OS X

  • Server: The IP address of your device. (Settings –> WiFi –> <Your Network Name>)
  • Protocol: SFTP
  • Username: root
  • Password: alpine

CyberDuck

6. Go to /User/Media directory and then copy over the DCIM folder.

7. Reboot your device.

After that you’ll have all your backuped photos back.

IMG 0079 21 300x400 Tutorial: how to connect external HDD to Apple iPad

iPad USB Camera Connection Kit is much more useful as it seems. Max Sha, an experienced user, was able to access external hard drive with this kit. All you need is a jailbroken iPad, an external drive, a split-USB cable to give the drive some power and a terminal of some sort (f.e. MacBook) to mount the external storage. While it is a little unwieldy, it shows that Terabytes of external storage for iPad is possible.

Here is a complete step-by-step guide from Max Sha:

For starters, you will need to do the following:

1. Have an external hard drive formatted to either HFS or FAT32. NOTE: All data will be erased!

2. Perform the Spirit Jailbreak.

3. In Cydia, install iFile ($4.00 for full version, but there is also a free trial) and OpenSSH (free)

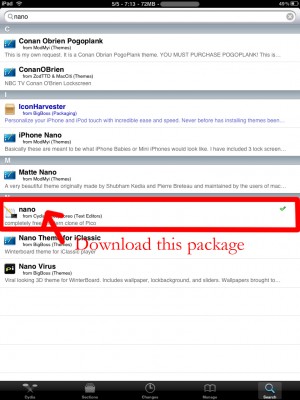
4. As well, install the “Nano” terminal text edit from Cydia.

Fig 5 300x400 Tutorial: how to connect external HDD to Apple iPad

5. For this particular example Max used GoodReader app for iPad ($0.99).

Now you can begin the process of mounting your hard drive. You will need external power for the drive. If you have an external drive with power (one that has a USB port and an external power supply) you won’t need to worry about this. If you have external drive with just an USB cord you will need a split USB cord.

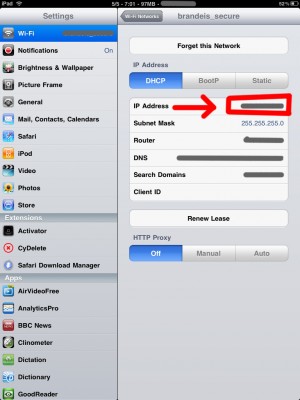
1. Open “Settings” on your iPad to find your IP address (make sure you’re on the same network as your iPad).

Fig 9 300x400 Tutorial: how to connect external HDD to Apple iPad

2. Open Terminal, on your Mac (/Applications/Utilities/Terminal.app). On Windows you can use Putty.

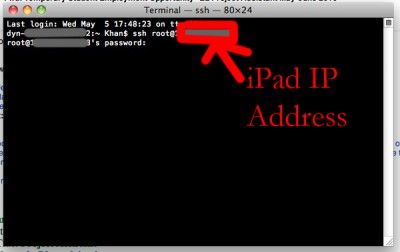
3. At the prompt, SSH into your iPad with the IP address you found in the “Settings” app (make sure OpenSSH is installed!), with the following:

ssh root@[iPad IP address]

Fig 10 400x252 Tutorial: how to connect external HDD to Apple iPad

For you first time users, the password for your root account will be “alpine”. NOTE: Please change your password ASAP. To do this, once you’ve logged in VIA Terminal, type the following into the command prompt:

passwd root

You will then be prompted for a new password. Please do the same for your “mobile” user as well, by doing the following:

passwd mobile

4. Now, type the following, in Terminal:

mkdir /Volumes
mkdir /Volumes/EXT
ln -s /Volumes/EXT /var/mobile/EXT
nano /var/stash/Applications.xxxxxx/iFile.app/Info.plist (“xxxxxx” is a series of numbers after “Applications”. If you type “/var/stash/Applications” and hit the “Tab” key, it will fill in the rest for you).

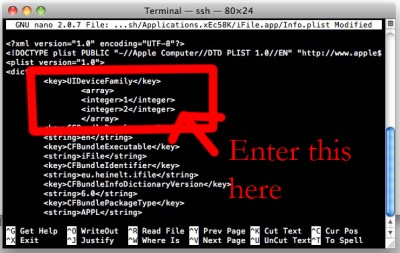
5. The nano text editor will now open. Please add the following lines below the first “<dict>”, in the document (this makes iFile look much better on the iPad):

Fig 13 400x253 Tutorial: how to connect external HDD to Apple iPad

<key>UIDeviceFamily</key>
<array>
<integer>1</integer>
<integer>2</integer>
</array>

6. Then hit “Ctrl+x”. Followed by “Y”, and then “Enter”. This will save the changes that you made.

7. Now, reboot your iPad. You will notice that your SSH connection will have closed, in Terminal. Re-open terminal, when the iPad reboots, and follow steps 1-3 (without reseting the passwords again).

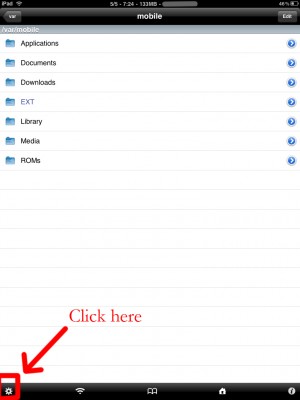
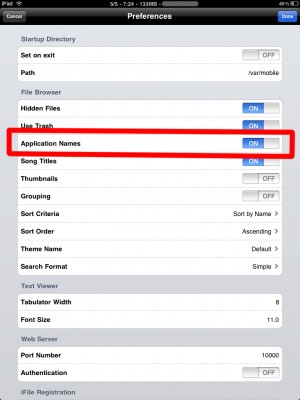
8. Open iFile, and go into the settings. It is recommended to have the settings set as shown below. The most important is enabling “Application Names”. Hit “Done”. Close out of iFile by hitting the Home button. Restart iFile.

Fig 15 300x400 Tutorial: how to connect external HDD to Apple iPad

FIG 16 300x400 Tutorial: how to connect external HDD to Apple iPad

9. In iFile, navigate to “/Volumes/”. Then, select the “Edit” button, in the top right.

10. Check the circle next to the “EXT” folder you created in “Step 4″.

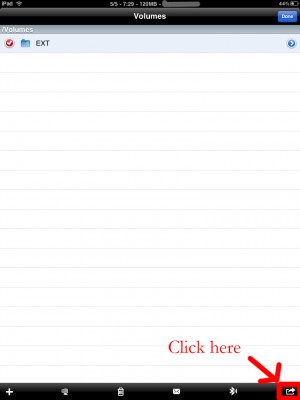
11. Click the “Box with an arrow”, in the bottom right. In the dialogue box that opens, select “Copy/Link”.

Fig 19 300x400 Tutorial: how to connect external HDD to Apple iPad

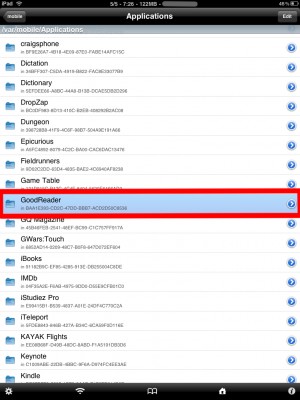
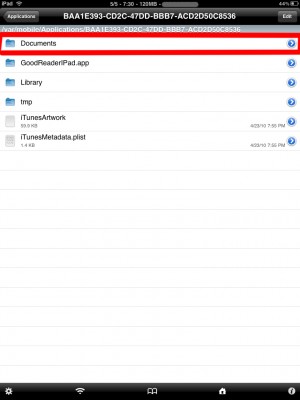
12. In iFile, Navigate to “var/mobile/Applications/”. You should now see the names of applications above the actual folder names. Navigate to the “GoodReader” folder, then the “Documents” folder.

Fig 20 300x400 Tutorial: how to connect external HDD to Apple iPad

Fig 21 300x400 Tutorial: how to connect external HDD to Apple iPad

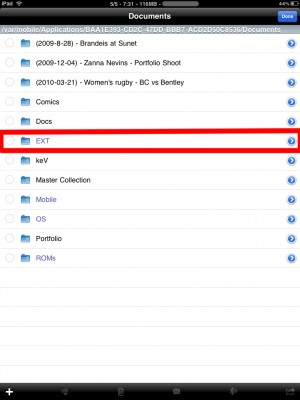
13. Click the “Edit” button again. And then click the “Box with an arrow”, in the bottom right. Click the “Create Link” button. You should now see the “EXT” folder. Hit “Done” in the upper right.

Fig 22 300x400 Tutorial: how to connect external HDD to Apple iPad

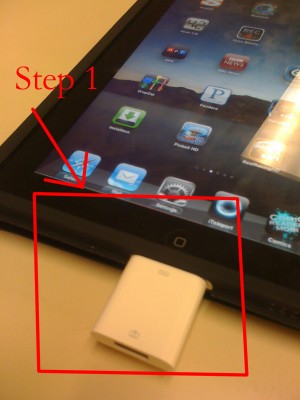
14. Now, connect your iPad Camera Connection Kit.

Fig 23 300x400 Tutorial: how to connect external HDD to Apple iPad

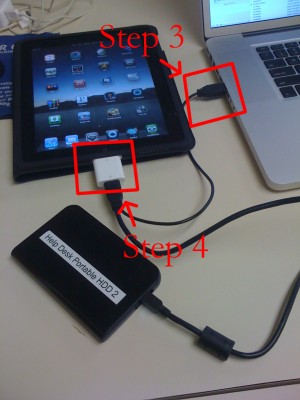
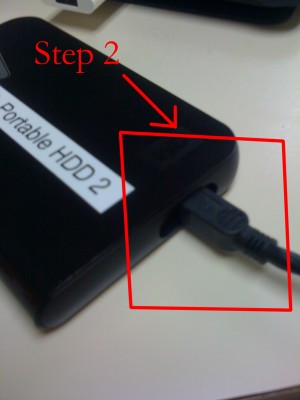
15. Take your hard drive and plug the secondary port into a power supply (in this case, Macbook Pro). Then, plug the main USB port into the iPad. You may see a message similar to “Insufficient power to mount this drive” error message on the iPad. With an external power supply, it should be much more convenient. NOTE: You MUST plug in the external power supply first, or else the iPad will not mount the drive.

Fig 24 300x400 Tutorial: how to connect external HDD to Apple iPad

IMG 0079 21 300x400 Tutorial: how to connect external HDD to Apple iPad

16. Now, lets go back to terminal. Type:

ls /dev

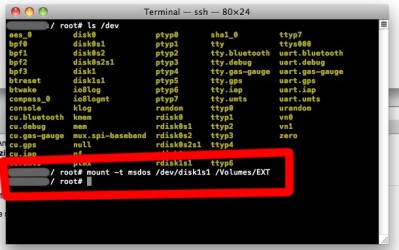
What you’re looking for here is the file “disk1s1″. If that does not show up, try steps 15-16 again. If you see “disk1s1″, proceed to step 17.

17. For a FAT32 formatted drive, type the following, into terminal:

Fig 26 399x250 Tutorial: how to connect external HDD to Apple iPad

mount -t msdos /dev/disk1s1 /Volumes/EXT

It will take a few seconds, and then return you to the command prompt. For an HFS drive, type the following:

mount -t HFS /dev/disk1s1 /Volumes/EXT

18. You are now good to go! You can now access the files in either iFile, or GoodReader. As an example of how to manipulate the files, watch the video below.

19. To unmount the drive, type the following, in Terminal:

umount /dev/disk1s1

20. That’s all!

Here is a video demonstration:

Many thanks to Max Sha!

apple worm 300x210 New iPhone Worm Wants Users Bank Passwords

A second iPhone worm virus has been found by security company F-Secure. It is specifically targeting people in the Netherlands who are using their iPhones for internet banking with Dutch online bank ING.

It redirects the bank’s customers to a site with a log-in screen (phishing). The worm attacks “jailbroken” phones – a modification which enables the user to run non-Apple approved software on their handset. Only handsets with installed SSH (secure shell) are at risk. SSH is a file-transfer program that enables users to remotely connect to their phones. It comes with a default password, ‘alpine’ which should be changed.

Here is a tutorial how to change the default SSH password and minimize the risk.

itunes iTunes 8.2 released

Apple released iTunes 8.2. You can download it here.

This update breaks your ability to use QuickPwn, PwnageTool, and iPhone Tunneling Suite (ssh over usb). Many file managers do not work with iTunes 8.2 installed. We don’t think this is a deliberate breakage of these tools.  It’s just that Apple has updated a low-level USB protocol. It may also break Palm Pre’s connection to the device.

So if you jailbreak, we recommend you not to update.

Many iPhone 3G users would like to use internet on a desktop or notebook through their phone. There were several solutions: iPhoneModem, NetShare, 3Proxy.. they all used SSH and SOCKS proxy. One of the working ones was described here get internet on a desktop or notebook through IPhone 3G.

Couple days ago PdaNet (fullname is PdaNet WiFi Router) was ported to iPhone. Now our life is much much easier.

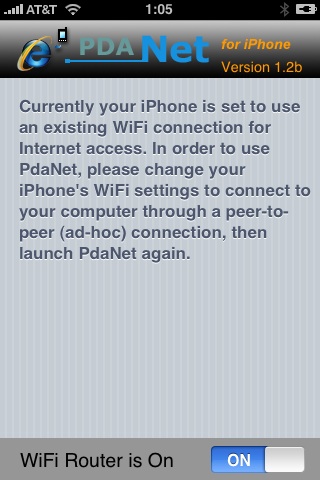
pdanet Connect desktop or notebook to internet through iPhone 3G

What you need is a jailbreaked iPhone with Cydia installer. Then install PdaNet.

All you need to do is simply to create an ad-hoc WiFi network on the computer and connect your iPhone to it (instructions). Your computer then goes online automatically. There is no need to specify IP (or any other) settings on either end.

Some nice features:

  • You will get FULL Internet access on the computer! (Instead of only applications that support Socks proxy.) In technical terms, all applications make direct TCP/IP connections to the server. Since there is no proxy involved, that also means less problems and less delays.
  • You don’t need to configure anything on the computer end whenever you connect PdaNet. No proxy settings, no extra software installation, no messing with static IP assignment, no switching settings back and forth when going back to your home’s WiFi router.
  • Yes it will connect at 3G speed if your phone has the coverage.
  • Supports PC, MAC, Linux or anything (include other PDA/phones) that connects to a WiFi router.
  • PdaNet runs in the background so you can still use other iPhone features when PdaNet is connected. But when you are done with them, go back to PdaNet to prevent the phone from entering idle and drops your connection.
  • To turn off the phone screen when using PdaNet, just cover the upper part of the phone (or simply flip the phone upside down). This will conserve your battery.
  • It is recommended that you charge the phone at the same time while using PdaNet, because both WiFi and 3G will be put on full speed, both consume a lot of juice.

One last note: over-usage of PdaNet’s tethering is likely to draw the eye and the ire of AT&T (if you use this provider), so use with care!

main mail 235x300 Mail app crashing on 2.0? There is a solution.

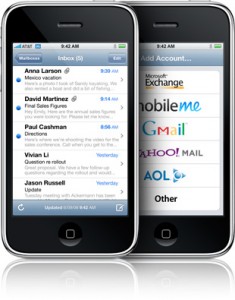
Is your mail crashing on 2.0 firmware?

This is generally caused after syncing your backup. This has nothing to do with jailbreaking or not. However, the fix for it is simple and is part of a jailbreak. The issue is that after syncing your backup, your mail folder is owned by root and your mail app running as user mobile does not have permissions to access it. You can fix it in SSH. But I also added a button in BossPrefs to solve it.

Step 1:Jailbreak your device

Step 2: Install BossPrefs from Cydia

Step 3: Tap “more”

Step 4: Tap “Fix User Dir Permissions”

Step 5: Sometimes, not always, you will need to load settings and reenter your mail passwords.

via sleepers.net

  • Page 2 of 2
  • <
  • 1
  • 2