SD | Jailbreak iPhone, iPod Touch, iPad Skip to content

Jailbreak iPhone, iPod Touch, iPad

новости про джейлбрейк iPhone, iPod Touch и iPad

Archive

Tag: SD

Apple on Wednesday released iOS 8 to users worldwide. As it was expected, the new mobile operating system brings lots of improvements and bug fixes. Apart from that, it is far more secured and efficient and can boast lots of new features. The most noticeable among them are the widely-rumored Health app, QuickType, the support of third-party keyboards, updated Mail, Photos, Camera and Safari and the apps like Continuity, Handoff, AirDrop, Instant Hotspot, which were previously unavailable for users.

ios 8 official 225x400 Apple Officially Releases iOS 8 to Users Worldwide

iOS 8 delivers a simpler, faster and more intuitive user experience with new Messages and Photos features, predictive typing for Apple’s QuickType keyboard and Family Sharing. iOS 8 also includes the new Health app, giving you a clear overview of your health and fitness data and iCloud Drive, so you can store files and access them from anywhere.

For more details about the latest iOS version, go to Apple’s official website. The update is available via Software Update, but those who use jailbroken devices and want to save their jailbreak should stay away from iOS 8. Keep this in mind.

[via iClarified]


On Wednesday, September 17th Apple is expected to release iOS 8. This means that there only several hours left for those who need to restore their jailbroken iPhones to iOS 7.1.2 without losing jailbreak. After iOS 8 is released, the guys from Cupertino will no longer be signing iOS 7.1.2. In this case, if a user tries to restore the device using iTunes, he will be forced to update to iOS 8.

jailbreak announcement 500x340 Important Note for iOS 7 Users Ahead of iOS 8 Release

Another important announcement is also targeted at the jailbroken iPhone users. If you want to save your jailbreak, do not update to iOS 8 as currently there’s no evidence that it is jailbreakable. Moreover, as it was mentioned above, you won’t be able to restore or downgrade your smartphone to the earlier version of iOS. If your device works fine, keep using iOS 7.

Those who have an iPhone running iOS 7.1.2 or lower can use two utilities for jailbreak, namely, Pangu or evasi0n. Whether these tools will be compatible with iOS 8 is still a question without an answer. Stay tuned for more news about iOS 8 and jailbreak.

Earlier this week it was reported that iOS 7 doesn’t encrypt email attachments, though it should. The only possible way out was not to detach important or confidential files to emails, but fortunately, another one appeared on Wednesday.

email encryption tweak 392x400 Attachment Encryptor: Fix for Email Encryption Issue

A developer named Ryan Petrich released a new jailbreak tweak that helps to fix the email encryption issue. This tweak is called ‘Attachment Encryptor’.

Here’s what iDownloadBlog reporters write about Petrich’s creation:

Prominent jailbreak developer Ryan Petrich released ‘Attachment Encryptor’ this evening, a tweak that patches the aforementioned bug. All you have to do is install it and respring your iPhone or iPad.

The tweak is available for free via Petrich’s beta repo. You can add it by entering ‘Manage’ tab in Cydia and hitting Sources and Add sections. After you select the last menu, you need to enter http://rpetri.ch/repo/. That’s all.

I honestly hope that Apple will fix the issue in the next iOS version.

I’ve got some good news for those iPhone 4s users, who plan to jailbreak their iPhones running iOS 7.1. It is possible to hack the older models of Apple’s smartphones. However, it doesn’t necessarily mean that you should upgrade to the latest version of iOS right now. And here’s why.

iphone4s jailbreak ios7.1 500x256 iH8Sn0w Confirms Untethered Jailbreak on iPhone 4s Running iOS 7.1

Following Winocm, who has recently posted a video showing the iOS 7.1 untethered jailbreak on iPhone 4, another hacker – iH8Sn0w – on Wednesday confirmed the successful jailbreak of his iPhone 4s running the same Apple’s iOS 7.1.

Here’s what he tweeted:

NGeary14: @iH8sn0w Can you jailbreak 7.1 iPhone 4s or only 4 ??

iH8Sn0w: @NGeary14 well my 4S is jailbroken on 7.1 atm.

Looks like it is possible to jailbreak any iOS device equipped with an Apple A4 or Apple A5 processor. As to the other iPhones and iPads, there’s no information yet.

iH8Sn0w claims that there won’t be any public jailbreak, at least now. That is why I recommend you to stay away from iOS 7.1. Especially if you have an iPhone 5/5c with Apple A6 CPU or iPhone 5s with Apple A7 CPU on board.

Looks like Apple has found a way to prevent people from jailbreaking their iOS devices. According to iH8sn0w, iOS 7.1 beta 5, released on Tuesday, patches two exploits used to jailbreak Apple’s smartphones and tablets. Keep in mind that the fourth beta patched another vulnerability used by evasi0n7. It appears that beginning from iOS 7.1, it would be impossible to hack your iPhone, iPad or iPod touch. And that is definitely not good.

7.1 beta 5 jailbreak 500x328 Two More Evasi0n7 Exploits Successfully Patched in iOS 7.1 Beta 5

As noted by iDownloadBlog,

Developer and hacker iH8sn0w tweeted out a few moments ago that Apple has fixed the ‘chown’ vulnerability and ‘afc sandbox escape’ used by the evad3r’s popular jailbreak utility in beta 5. So it looks like iOS 7.1 will indeed be the death of the iOS 7 JB.

Despite all the facts given above, it is too early to panic. So far, the evad3rs haven’t officially confirmed that the evasi0n7 won’t work on iOS 7.1. Apart from that, iH8sn0w has recently found a way to jailbreak A5 devices for good and this method might also work for A6 and A7 devices as well.

Nevertheless, it is recommended that you update to iOS 7.0.4 or iOS 7.0.5 and stay away from iOS 7.1 betas. At least for some time.

As you probably know, a few days ago iH8sn0w, winocm and SquiffyPwn have released an untethered jailbreak for smartphones and tablets running iOS 6.1.3 – 6.1.5 – p0sixspwn. At first it was available only for Mac users, however, things have changed. Yes, you’ve got that right, p0sixspwn (version 1.0.4) for Windows is finally out.

jaibreak windows Untethered Jailbreak for iOS 6.1.3   6.1.5 Released (Mac/Windows)

At the same time, the new version of the jailbreak utility for Mac – 1.0.3 – is coming soon. If you have any problems with 1.0.2, it is recommended that you update to 1.0.3 since it is more stable.

Don’t forget to make a backup before jailbreaking your device and remember you hack your smartphone or tablet at your own risk.

One can download p0sixspwn for both Mac (version 1.0.2) and Windows (version 1.0.4) here.

sn0wbreeze 297 500x396 Sn0wBreeze 2.9.7 released: iOS 6.0.1 support added

iH8Sn0w released Sn0wBreeze 2.9.7 that brings support for tethered jailbreak of iOS 6.0.1. New version supports iPhone 3GS, iPhone 4 and iPod Touch 4G. It does not work with A5/A6 devices, like iPad 2, iPad 3, iPhone 4S, iPhone 5, etc.

Sn0wbreeze can be used to create a custom firmware with jailbreak and preserve iPhone modem (baseband) version for unlock.

You can find the release notes below. You can download the latest version of Sn0wBreeze from here.

What is New?
● Added 6.0 (10A403)/6.0.1 (10A523) support. (Only includes iPhone 3GS & A4 devices).
● The 6.0/6.0.1 is currently a tethered based jailbreak via iBooty (except for iPhone 3GS old bootrom users).
● SAM is built-in for iOS 6 hacktivations. (Hacktivated phones can reboot to a semi-tethered state after being activated [rather than just hang at the Apple Logo]). Kudos @sbingner!

Downgrading:
● Use iFaith mode after selecting/downloading the appropriate IPSW for your device. You will then be prompted to browse for SHSH blobs for the IPSW you have selected.
● Remember to enter a PWNED DFU state with sn0wbreeze’s iREB button in the top bar of sn0wbreeze prior to (SHIFT + Restoring) the custom signed IPSW!

iREB & iOS 6:
Due to some changes in iOS 6, the current public standalone version of iREB will NOT enter a proper PWNED DFU state for restoring to custom iOS 6 IPSWs. An update for the standalone version should come sometime this week. In the meantime, use the iREB tab located in sn0wbreeze’s top status bar to enter a proper PWNED DFU state.

A5(X)/A6(X) Support?:
As stated many times in the past, sn0wbreeze cannot be updated to work on A5(X)/A6(X) devices until a low level exploit in DFU or iBoot is found and made public.

A5(X)/A6(X) Baseband Preservation/Hacktivation?
For those running A5(X)/A6(X) devices and need to preserve your baseband, there is nothing you can do at the moment. For those wanting to hacktivate, the only advice I can give is to buy the carrier’s SIM (the one its locked to obviously) on ebay. The SIM does not have to be active with the carrier to activate the phone.

Known Bugs/Issues:
● Windows 8 users currently need to use this workaround to run sn0wbreeze.
● iPad baseband will fail to flash on iOS 4.0 –> iOS 4.2.1 restores.
● iPod Touch 2G 4.x.x restores fail.

ios for ipad

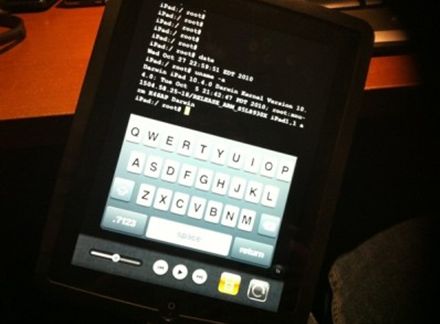
It seams that hackers have had their hands on the iOS 4.2 beta 3 for iPad. But, as we know, there is no official jailbreak for it. Recently the well-known iOS hacker posted aт interesting picture in Tweeter. The shot depicts an iPad running MobileTerminal, a jailbreak application, which gives users full access to the terminal command line interface. But it looks strange, because it means that the hackers missed the beta 4, which should be released this past Tuesday, according to the Apple’s schedule. This could signal that Apple may skip beta 4 altogether and go straight to a GM build sometime next week.

IMG 0079 21 300x400 Tutorial: how to connect external HDD to Apple iPad

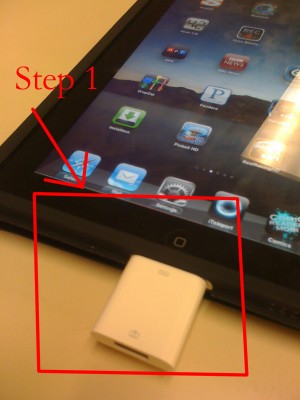
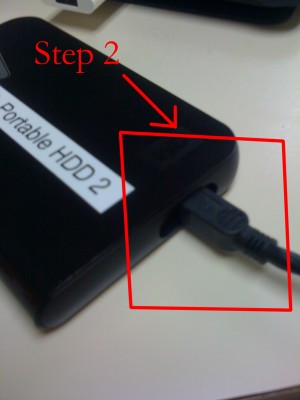
iPad USB Camera Connection Kit is much more useful as it seems. Max Sha, an experienced user, was able to access external hard drive with this kit. All you need is a jailbroken iPad, an external drive, a split-USB cable to give the drive some power and a terminal of some sort (f.e. MacBook) to mount the external storage. While it is a little unwieldy, it shows that Terabytes of external storage for iPad is possible.

Here is a complete step-by-step guide from Max Sha:

For starters, you will need to do the following:

1. Have an external hard drive formatted to either HFS or FAT32. NOTE: All data will be erased!

2. Perform the Spirit Jailbreak.

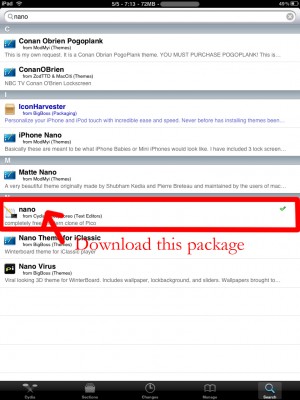
3. In Cydia, install iFile ($4.00 for full version, but there is also a free trial) and OpenSSH (free)

4. As well, install the “Nano” terminal text edit from Cydia.

Fig 5 300x400 Tutorial: how to connect external HDD to Apple iPad

5. For this particular example Max used GoodReader app for iPad ($0.99).

Now you can begin the process of mounting your hard drive. You will need external power for the drive. If you have an external drive with power (one that has a USB port and an external power supply) you won’t need to worry about this. If you have external drive with just an USB cord you will need a split USB cord.

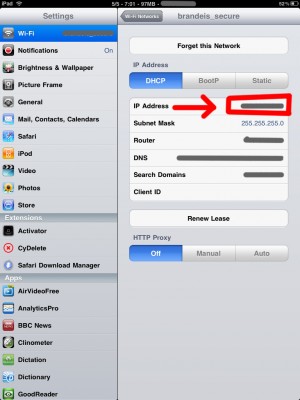
1. Open “Settings” on your iPad to find your IP address (make sure you’re on the same network as your iPad).

Fig 9 300x400 Tutorial: how to connect external HDD to Apple iPad

2. Open Terminal, on your Mac (/Applications/Utilities/Terminal.app). On Windows you can use Putty.

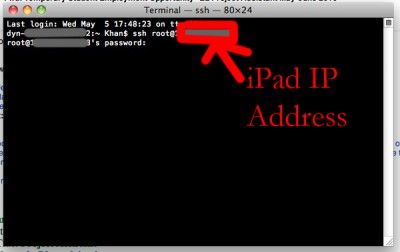
3. At the prompt, SSH into your iPad with the IP address you found in the “Settings” app (make sure OpenSSH is installed!), with the following:

ssh root@[iPad IP address]

Fig 10 400x252 Tutorial: how to connect external HDD to Apple iPad

For you first time users, the password for your root account will be “alpine”. NOTE: Please change your password ASAP. To do this, once you’ve logged in VIA Terminal, type the following into the command prompt:

passwd root

You will then be prompted for a new password. Please do the same for your “mobile” user as well, by doing the following:

passwd mobile

4. Now, type the following, in Terminal:

mkdir /Volumes
mkdir /Volumes/EXT
ln -s /Volumes/EXT /var/mobile/EXT
nano /var/stash/Applications.xxxxxx/iFile.app/Info.plist (“xxxxxx” is a series of numbers after “Applications”. If you type “/var/stash/Applications” and hit the “Tab” key, it will fill in the rest for you).

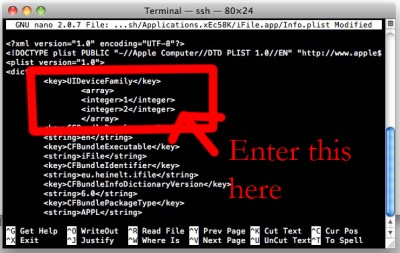
5. The nano text editor will now open. Please add the following lines below the first “<dict>”, in the document (this makes iFile look much better on the iPad):

Fig 13 400x253 Tutorial: how to connect external HDD to Apple iPad

<key>UIDeviceFamily</key>
<array>
<integer>1</integer>
<integer>2</integer>
</array>

6. Then hit “Ctrl+x”. Followed by “Y”, and then “Enter”. This will save the changes that you made.

7. Now, reboot your iPad. You will notice that your SSH connection will have closed, in Terminal. Re-open terminal, when the iPad reboots, and follow steps 1-3 (without reseting the passwords again).

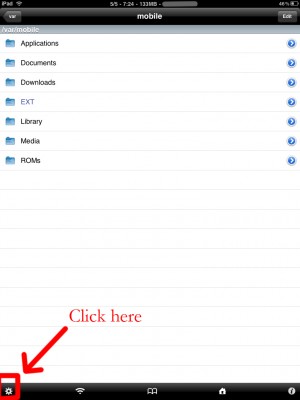
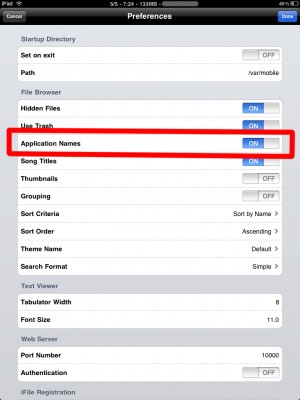
8. Open iFile, and go into the settings. It is recommended to have the settings set as shown below. The most important is enabling “Application Names”. Hit “Done”. Close out of iFile by hitting the Home button. Restart iFile.

Fig 15 300x400 Tutorial: how to connect external HDD to Apple iPad

FIG 16 300x400 Tutorial: how to connect external HDD to Apple iPad

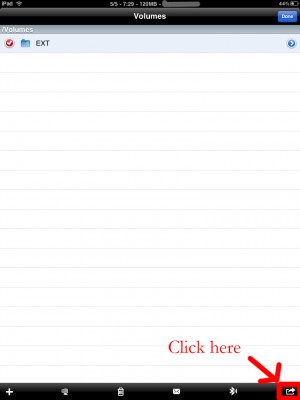
9. In iFile, navigate to “/Volumes/”. Then, select the “Edit” button, in the top right.

10. Check the circle next to the “EXT” folder you created in “Step 4″.

11. Click the “Box with an arrow”, in the bottom right. In the dialogue box that opens, select “Copy/Link”.

Fig 19 300x400 Tutorial: how to connect external HDD to Apple iPad

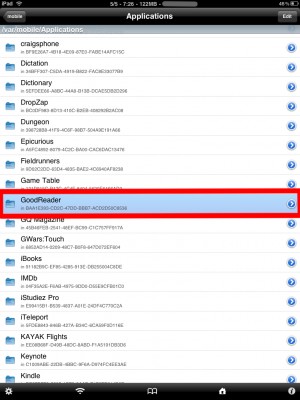
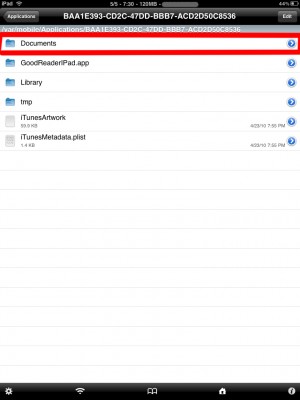
12. In iFile, Navigate to “var/mobile/Applications/”. You should now see the names of applications above the actual folder names. Navigate to the “GoodReader” folder, then the “Documents” folder.

Fig 20 300x400 Tutorial: how to connect external HDD to Apple iPad

Fig 21 300x400 Tutorial: how to connect external HDD to Apple iPad

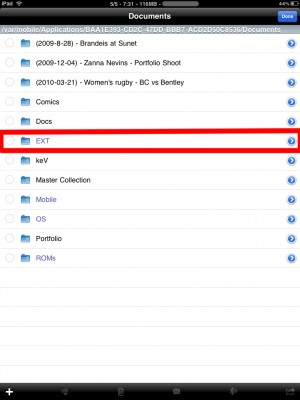
13. Click the “Edit” button again. And then click the “Box with an arrow”, in the bottom right. Click the “Create Link” button. You should now see the “EXT” folder. Hit “Done” in the upper right.

Fig 22 300x400 Tutorial: how to connect external HDD to Apple iPad

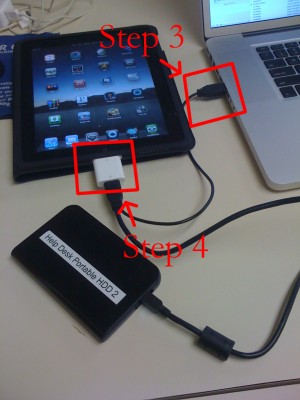
14. Now, connect your iPad Camera Connection Kit.

Fig 23 300x400 Tutorial: how to connect external HDD to Apple iPad

15. Take your hard drive and plug the secondary port into a power supply (in this case, Macbook Pro). Then, plug the main USB port into the iPad. You may see a message similar to “Insufficient power to mount this drive” error message on the iPad. With an external power supply, it should be much more convenient. NOTE: You MUST plug in the external power supply first, or else the iPad will not mount the drive.

Fig 24 300x400 Tutorial: how to connect external HDD to Apple iPad

IMG 0079 21 300x400 Tutorial: how to connect external HDD to Apple iPad

16. Now, lets go back to terminal. Type:

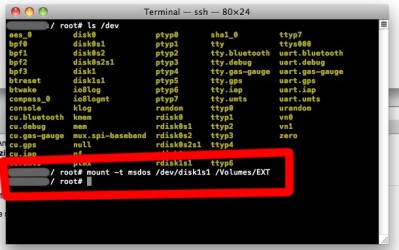
ls /dev

What you’re looking for here is the file “disk1s1″. If that does not show up, try steps 15-16 again. If you see “disk1s1″, proceed to step 17.

17. For a FAT32 formatted drive, type the following, into terminal:

Fig 26 399x250 Tutorial: how to connect external HDD to Apple iPad

mount -t msdos /dev/disk1s1 /Volumes/EXT

It will take a few seconds, and then return you to the command prompt. For an HFS drive, type the following:

mount -t HFS /dev/disk1s1 /Volumes/EXT

18. You are now good to go! You can now access the files in either iFile, or GoodReader. As an example of how to manipulate the files, watch the video below.

19. To unmount the drive, type the following, in Terminal:

umount /dev/disk1s1

20. That’s all!

Here is a video demonstration:

Many thanks to Max Sha!

keyboard 400x225 External IR Keyboard for iPhone Without Jailbreaking

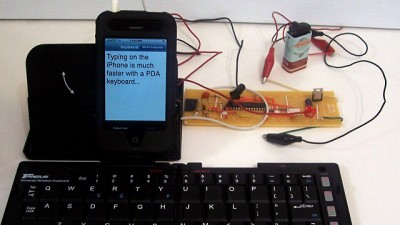
Perceptive Development developed a hardware and software solution that allows infrared keyboards to be used for typing on the iPhone, using less than $20 of electronics. They have managed to get an external keyboard working via a custom connection built for the headphone jack. Headphone jack in/out hardware is one of the few interfaces that’s open in the official SDK.

They have built a microcontroller that converts input from an external Targus IR keyboard into a format the iPhone’s headphone jack can understand, which is then fed to a terminal app that doesn’t require jailbreak. Nice!


Read the rest of this entry »

  • Page 1 of 2
  • 1
  • 2
  • >