Plist | Jailbreak iPhone, iPod Touch, iPad Skip to content

Jailbreak iPhone, iPod Touch, iPad

новости про джейлбрейк iPhone, iPod Touch и iPad

Archive

Tag: plist

ios8 jailbreak 500x273 Pangu released Untethered Jailbreak for iOS 8   iOS 8.1

The team behind the Pangu untethered jailbreak of iOS 7.1-7.1.2 has released a Pangu8 untethered jailbreak for iOS 8 – 8.1.

Currently a jailbreak utility is only available for Windows and at this time Cydia and Mobile Substrate are not working.

Here’s the translated details via reddit user zsm1703:

—–
PanGu iOS 8 Jailbreak Tool(pangu.io)
1. Preparations for jailbreak.
Backup before using pangu jailbreak tool. Although this tool is tested successfully on most devices, we still hope you backup your data to avoid data loss. Please turn off the screen password lock and close the “find my iPhone” feature in the iCloud settings before jailbreak.

2. the firmware upgraded via OTA may cause failure.
The firmware upgraded via OTA will have a lot of influence factors. If you have several failed attempts, Please try to download the latest firmware and restore your iOS devices. In addition, Pangu (iOS 8) tool now add a function to restore iOS devices and execute automatic activation, you can try click the jailbreak button after restoring, and Pangu will automatically activate your device and do jailbreak.

3. “Storage capacity is almost full.”?
This is because the jailbreak program will write important files into the system directory and cause alarm, it will not affect the result. When the Cydia be compatible, click on the Cydia will launch the directory moving process.

4. About afc2?
Because Apple made a lot of adjustments to the system, you cannot use afc2 plug-ins at present.

5. Do not delete “com.apple.mobile.softwareupdated.plist”
Do not delete “com.apple.mobile.softwareupdated.plist”, otherwise it will cause system failure.

6. Processing method of jailbreak failure
Please enable the Airplane mode and close Wifi and then try to jailbreak, or if not successful, please restart your devices and then try. If it still fails, please use the Pangu restore function and jailbreak again.
—–

iOS 8 jailbreak 1 491x400 Pangu released Untethered Jailbreak for iOS 8   iOS 8.1

Saurik has already indicated that he will work hard to get Cydia compatible as soon as possible.

So, windknown has contacted me, about a half hour ago, via e-mail. He has told me one of the issues that is keeping Substrate from working on the device, which will probably require me to build a little binary patch for dyld as part of the Substrate installation sequence. This was the worst possible day for me, as I’m traveling back to Santa Barbara today (I’m currently in Texas, having come here to give a talk at The Big Android BBQ), which means this will take me a little longer than I’d like, but clearly getting Cydia and Substrate working on iOS 8 is my highest priority. I thankfully think that I actually can start working a little on one of the Substrate issues using an iOS 7 “model” based on the information provided by windknown, which means I’ll lose less time to not having all of my devices with me. (I currently have no clue why Cydia itself is not functioning, but will find out later today when I can see it myself.)

Update:
The Pangu team has pulled the original download link, likely to address some bugs. We recommend you follow iClarified to find out when a safe version is available.

Update x2:
Pangu8 1.0.1 has been released resolving an issue that could cause the loss of your photos. You can download Pangu8 here.
Once its confirmed that the jailbreak is safe and Cydia and Mobile Substrate are working we will posted detailed instructions on how to jailbreak your device.

Update: iOS 8 compartible Cydia released.

pangu8 500x215 Pangu released Untethered Jailbreak for iOS 8   iOS 8.1

evasi0n fix 225x400 Evasi0n jailbreak fixes released: Weather App and Long Reboot evasi0n fix2 225x400 Evasi0n jailbreak fixes released: Weather App and Long Reboot

The Evad3rs have released fixes for the those experiencing problems with the Weather app or long reboots after performing the Evasi0n jailbreak.

The fixes can be applied easily by updating the evasi0n 6.x untether and uikittools packages in Cydia, reports planetbeing:

Fixes for the long reboot issue and Weather app issue are now available on Cydia with an update to the untether and uikittools.

Update:

It looks like AppSync, tweak for app piracy causes the Weather App to fail. Planetbeing Reports:

People are reporting uninstalling AppSync AND rebooting are solving their issues.

Try having AppSync uninstalled and deleting com.apple.mobile.installation.plist, com.apple.LaunchServices-045.csstore and rebooting

MuscleNerd adds:

AppSync didn’t cause weather app problem, but it prevents today’s fix from working. Also likely breaks iCloud apps. Piracy has costs.

If you are having issues even after updating these packages it appears that App Sync may be cause. Users who have uninstalled AppSync and rebooted are reporting success.

redsn0w 0912b1 325x400 RedSn0w 0.9.12b1 and PwnageTool 5.1.1 released: support iOS 5.1.1 untethered jailbreak redsn0w 0912b1 extras 325x400 RedSn0w 0.9.12b1 and PwnageTool 5.1.1 released: support iOS 5.1.1 untethered jailbreak

The iPhone Dev-Team has released updates to RedSn0w and PwnageTool that bring support for the iOS 5.1.1 untethered jailbreak.

RedSn0w 0.9.12b1 supports untethered iOS 5.1.1 jailbreak for all devices:

  • iPhone 3GS
  • iPhone 4
  • iPhone 4S
  • iPad 1
  • iPad 2
  • new iPad 3
  • iPod Touch 3G
  • iPod Touch 4G

PwnageTool 5.1.1 allows to create custom firmware and preserve modem version for unlock with ultrasn0w or Gevey. PwnageTool 5.1.1 supports all A4 devices:

  • iPhone 3GS
  • iPhone 4
  • iPad 1
  • iPod Touch 3G
  • iPod Touch 4G
  • Apple TV 2G

You can download RedSn0w 0.9.12b1 here and PwnageTool 5.1.1 here.

iOS 5.1.1 untethered jailbreak tutorial using Redsn0w is available here.

Official DevTeam comments:

RedSn0w
redsn0w allows owners of A4+earlier devices to install rocky-racoon two different ways:

  • backup/restore method similar to Absinthe and cinject
  • its traditional limera1n-based ramdisk install. If you have a lot of media on your A4 device (music, movies, TV shows, etc), then the ramdisk method is preferrred because it avoids any possibility of later problems related to syncing to iCloud (including Photo Stream and Music Match). The ramdisk method is not available for A5 devices or later because limera1n can’t be used. If you’d like to use redsn0w’s ramdisk method, just be sure to put the A4 device in DFU or Recovery mode before starting redsn0w (otherwise it will immediately start to use the backup/restore method).

We’ve also added a new redsn0w feature specifically for those who got in on the SAM unlock: you can now include your SAM tickets as part of your initial ramdisk jailbreak of iPhone4 or earlier, or alternatively you can upload your SAM tickets to any device after its been jailbroken. redsn0w accepts either the individual SAM activation ticket plist file, or the entire zip file created by redsn0w’s “Backup” button. As usual, redsn0w continues to cover all of its previous jailbreaks and untethers (so redsn0w-0.9.12b1 covers everything from 5.1.1 all the way back to 4.1).

PwnageTool
PwnageTool also avoids any possible sync issues, but again it applies only to A4+earlier devices. If you unlock your iPhone with ultrasn0w or a commercial method, you must use PwnageTool to avoid updating your baseband otherwise you’ll lose the unlock. PwnageTool will also jailbreak+untether the AppleTV2,1 5.0_2B206f (unless you customize the IPSW further, you’ll have just basic SSH access to the device).

iphonefb Dropbox And Facebook iOS Apps Are Vulnerable To Credential Theft

This week Gareth Wright reported that Facebook’s app for iOS has a security vulnerability through which malicious users can access login credentials saved in a .plist file of the app. With a copy of that .plist file malicious users could automatically log into the affected user’s Facebook account on another device. Reportedly, the vulnerability also exists on Android devices.

Wright describes several different ways in which your login credentials could be obtained by a malicious user, including hidden applications installed on shared PCs, customized apps, or modified speaker dock that could copy your plist.

According to Facebook, the issue only affects jailbroken or lost devices, as it requires physical access or installation of a custom app on the device. But Wright and The Next Web pointed out that simply plugging into any device would be sufficient for malicious users to gather these files.

The Next Web has confirmed that Dropbox for iOS is also vulnerable to this issue. Given that two such high-profile apps as Facebook and Dropbox are vulnerable to credential theft, it is likely that other apps are also affected by the issue.

As many reports note, this method of gathering login credentials is not actively utilized in a malicious manner, and users can protect their data for the time being by not plugging their devices into shared computers and charging stations.

redsn0w 099b1 336x400 RedSn0w 0.9.9b1: Major Update to Jailbreak Utility redsn0w 099b1 extra 336x400 RedSn0w 0.9.9b1: Major Update to Jailbreak Utility

MuscleNerd has announced via Twitter that jailbreak utility RedSn0w 0.9.9b1 is released with major update and numerous new features:

Major improvements and features added to redsn0w 0.9.9b1! See update #9 at http://is.gd/6eek4Y Feedback: @redsn0w_testers

Indeed the list of new features is quite high. There are two main ones:

  • There is no need to download firmware any more. There is no need to push Browse IPWS button any more (but you still can).
  • Developers added lots of functionality to work with SHSH keys (extract, submit, download, verify, stitch etc)

However this new version does not bring features like untethered jailbreak for iOS 4.3.5 or iOS 5.

Due to some possible bugs we still recommend to use the old RedSn0w 0.9.8b7b, but the new 0.9.9b1 is worth seeing and playing with.

Here are links to our RedSn0w 0.9.8b7b iOS 4.3.5 jailbreak tutorials:

You can download RedSn0w 0.9.9b1 here:

Here is the full list of features from DevTeam:

Update #9: A bunch of new features!

  • uses DFU mode to try to automatically determine which device and FW you have
  • fetches pieces of public IPSWs from Apple (once).  Non-public IPSWs must be provided manually (once).  It then caches those pieces for future use.
  • Just boot” is a tethered boot.  Uses whatever “Preferences” you’ve set for boot logo and kernel boot-args
  • Pwned DFU” puts your device in a pwned DFU state for some of the iTunes stuff detailed below
  • Recovery fix” gets past 1015 types of errors (when baseband portion of restore fails).  Should work on iOS5 beta too
  • Select IPSW” is for picking non-public IPSWs, or overriding auto-detection
  • SHSH blobs” has a bunch of options…
    • Fetch” – fetch current PARTIAL blobs on device.  Should complete in under 10 or 15 seconds.  Puts the set of PARTIAL of blobs on your computer as a plist.  Checks if Cydia already has a full set for this device and build.  If not, it submits this PARTIAL set and returns Cydia’s acknowledgement or rejection
    • Verify”  – cryptographically verifies existing blob files from either redsn0w, TinyUmbrella, or Cydia server.  You can select a whole bunch of blobs to verify at once if you want (like the TinyUmbrella directory)
    • Submit”  – both verifies and submits one or more blob files to Cydia.  This lets you copy your entire TinyUmbrella cache of blobs up to the Cydia server
    • Query” - queries the Cydia server for all available FULL or PARTIAL blobs for a given set of ECIDs
    • Stitch” – stitches either FULL or PARTIAL blobs to a STOCK or CUSTOM IPSW
  1. Stitching is NOT yet supported on iPhones! Need to work out the baseband part of the restore process.
  2. FULL blobs stitched to a STOCK IPSW gives you a completely self-contained signed IPSW that iTunes will accept without any tricks (no need to go into pwned DFU mode, no need to start TinyUmbrella TSS server, no need to redirect to Cydia server for blobs)
  3. PARTIAL blobs stitched to any IPSW requires you to go into pwned DFU mode before running iTunes.  No need to start TU or use Cydia though.
  4. Stitching either FULL or PARTIAL blobs to a CUSTOM IPSW also requires a pwned DFU start before iTunes restores.  No need to start TU or use Cydia though./li>
  5. Will eventually support fetching the blobs directly from Cydia instead of a file on your computer

Mike Pan has successfully modified his iPhone 3GS and now it can record HD video at 1080x800px with 30 frames per second and up to 20Mbps! The original ability of this handset is 640x480px at 3 Mbps. Mike used the non-standard resolution so the video could be kept at the right aspect ratio.

So here is a short instruction how to enable HD-video recording on your iPhone 3GS with firmware 4.1 (as other firmwares haven’t been tested yet):

  1. Download HDVideo3GS.zip.
  2. Jailbreak your device and install SSH.
  3. Copy N88AP.plist to /System/Library/CoreServices/SpringBoard.app/
  4. Copy the 3 other plist-files to /System/Library/PrivateFrameworks/Celestial.framework/N88/
  5. Reboot your iPhone 3GS

Some features:

  • Low light capability cannot be enhanced, so dark areas will still have grains.
  • In case you want to send the recorded HD-video to YouTube in its original quality, use Pixelpipe from the App Store.
  • The maximum shutter duration has been increased so now you can take photos even in dark areas, but a steady surface or tripod is highly recommended.

Mike promises to release an app in cydia so that the procedure could be even simpler. For those who’d like to understand how he did it, he posted a detailed instruction here.

HDR iPhone 3 3GS Check out HDR photos on iPhone 3G or 3GS!

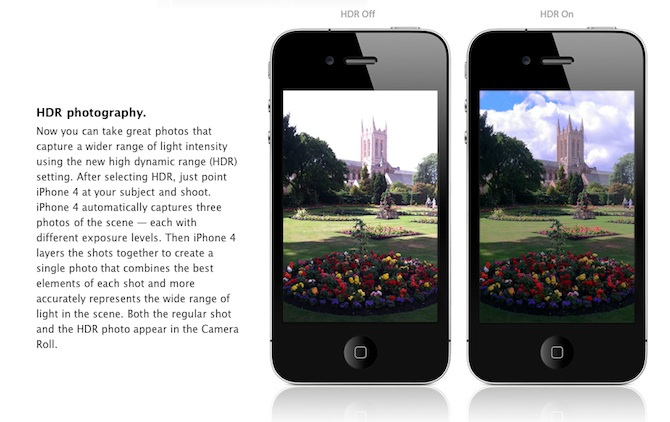
Are you looking forward to add a very popular HDR feature to your old iPhone? Do not worry! If you have a jailbroken (or ready to jailbreak) iPhone 3GS or 3G that runs on iOS 4.1, you can enable HDR photos. Here is a quick tutorial:

  • Make certain that you’ve installed OpenSSH via Cydia. When the application is installed, you’ll see SSH on your iPhone 3GS or 3G (it is recommended to use the «passwd» command to change your password from the standard «alpine»)
  • If you have an iPhone 3G, save the file, which is in / System/Library/CoreServices/SpringBoard.app/N82AP.plist
  • If you have an iPhone 3GS, save the file located at /System/Library/CoreServices/SpringBoard.app/N88AP.plist
  • Add a key «hdr-image-capture» with the “true” value
  • Save the file and use SSH to change a copy on your device with the modified version
  • Restart the SpringBoard or reboot your device. Now you’ve got access to the HDR settings in the application of your camera.

via

IMG 0079 21 300x400 Tutorial: how to connect external HDD to Apple iPad

iPad USB Camera Connection Kit is much more useful as it seems. Max Sha, an experienced user, was able to access external hard drive with this kit. All you need is a jailbroken iPad, an external drive, a split-USB cable to give the drive some power and a terminal of some sort (f.e. MacBook) to mount the external storage. While it is a little unwieldy, it shows that Terabytes of external storage for iPad is possible.

Here is a complete step-by-step guide from Max Sha:

For starters, you will need to do the following:

1. Have an external hard drive formatted to either HFS or FAT32. NOTE: All data will be erased!

2. Perform the Spirit Jailbreak.

3. In Cydia, install iFile ($4.00 for full version, but there is also a free trial) and OpenSSH (free)

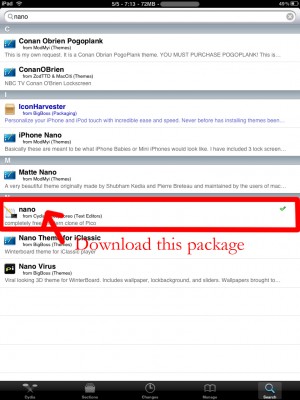
4. As well, install the “Nano” terminal text edit from Cydia.

Fig 5 300x400 Tutorial: how to connect external HDD to Apple iPad

5. For this particular example Max used GoodReader app for iPad ($0.99).

Now you can begin the process of mounting your hard drive. You will need external power for the drive. If you have an external drive with power (one that has a USB port and an external power supply) you won’t need to worry about this. If you have external drive with just an USB cord you will need a split USB cord.

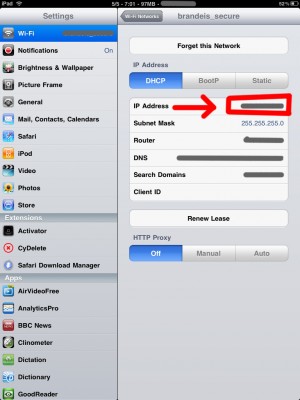
1. Open “Settings” on your iPad to find your IP address (make sure you’re on the same network as your iPad).

Fig 9 300x400 Tutorial: how to connect external HDD to Apple iPad

2. Open Terminal, on your Mac (/Applications/Utilities/Terminal.app). On Windows you can use Putty.

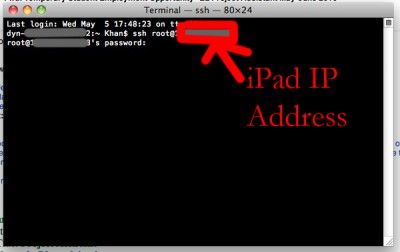
3. At the prompt, SSH into your iPad with the IP address you found in the “Settings” app (make sure OpenSSH is installed!), with the following:

ssh root@[iPad IP address]

Fig 10 400x252 Tutorial: how to connect external HDD to Apple iPad

For you first time users, the password for your root account will be “alpine”. NOTE: Please change your password ASAP. To do this, once you’ve logged in VIA Terminal, type the following into the command prompt:

passwd root

You will then be prompted for a new password. Please do the same for your “mobile” user as well, by doing the following:

passwd mobile

4. Now, type the following, in Terminal:

mkdir /Volumes
mkdir /Volumes/EXT
ln -s /Volumes/EXT /var/mobile/EXT
nano /var/stash/Applications.xxxxxx/iFile.app/Info.plist (“xxxxxx” is a series of numbers after “Applications”. If you type “/var/stash/Applications” and hit the “Tab” key, it will fill in the rest for you).

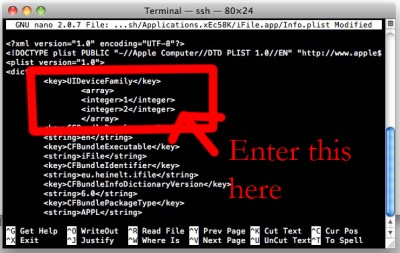
5. The nano text editor will now open. Please add the following lines below the first “<dict>”, in the document (this makes iFile look much better on the iPad):

Fig 13 400x253 Tutorial: how to connect external HDD to Apple iPad

<key>UIDeviceFamily</key>
<array>
<integer>1</integer>
<integer>2</integer>
</array>

6. Then hit “Ctrl+x”. Followed by “Y”, and then “Enter”. This will save the changes that you made.

7. Now, reboot your iPad. You will notice that your SSH connection will have closed, in Terminal. Re-open terminal, when the iPad reboots, and follow steps 1-3 (without reseting the passwords again).

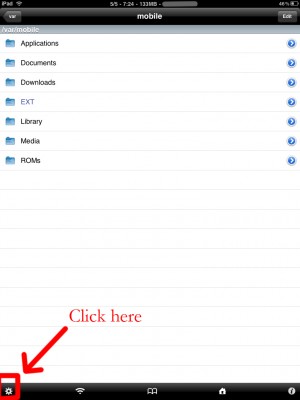
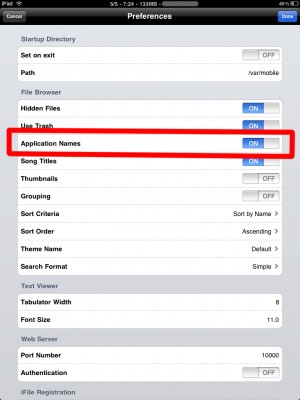
8. Open iFile, and go into the settings. It is recommended to have the settings set as shown below. The most important is enabling “Application Names”. Hit “Done”. Close out of iFile by hitting the Home button. Restart iFile.

Fig 15 300x400 Tutorial: how to connect external HDD to Apple iPad

FIG 16 300x400 Tutorial: how to connect external HDD to Apple iPad

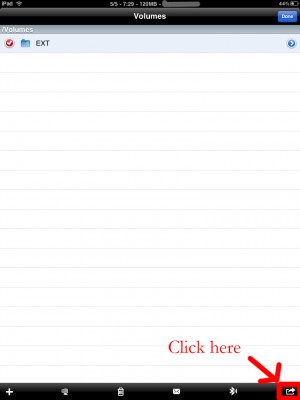
9. In iFile, navigate to “/Volumes/”. Then, select the “Edit” button, in the top right.

10. Check the circle next to the “EXT” folder you created in “Step 4″.

11. Click the “Box with an arrow”, in the bottom right. In the dialogue box that opens, select “Copy/Link”.

Fig 19 300x400 Tutorial: how to connect external HDD to Apple iPad

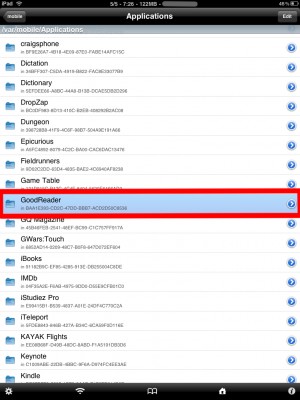
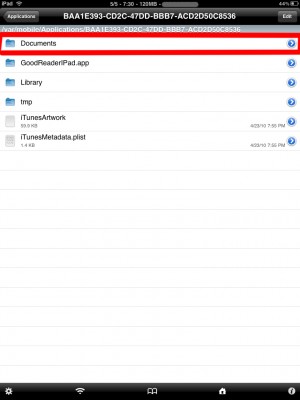
12. In iFile, Navigate to “var/mobile/Applications/”. You should now see the names of applications above the actual folder names. Navigate to the “GoodReader” folder, then the “Documents” folder.

Fig 20 300x400 Tutorial: how to connect external HDD to Apple iPad

Fig 21 300x400 Tutorial: how to connect external HDD to Apple iPad

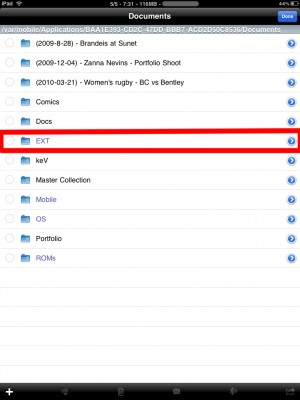
13. Click the “Edit” button again. And then click the “Box with an arrow”, in the bottom right. Click the “Create Link” button. You should now see the “EXT” folder. Hit “Done” in the upper right.

Fig 22 300x400 Tutorial: how to connect external HDD to Apple iPad

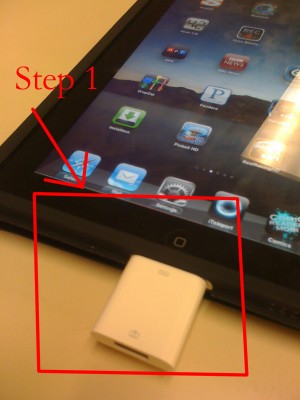
14. Now, connect your iPad Camera Connection Kit.

Fig 23 300x400 Tutorial: how to connect external HDD to Apple iPad

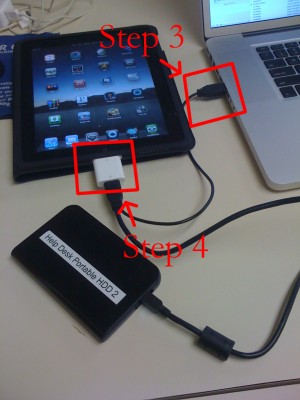
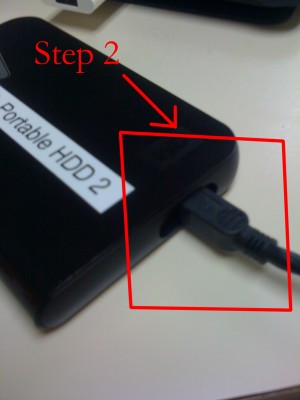
15. Take your hard drive and plug the secondary port into a power supply (in this case, Macbook Pro). Then, plug the main USB port into the iPad. You may see a message similar to “Insufficient power to mount this drive” error message on the iPad. With an external power supply, it should be much more convenient. NOTE: You MUST plug in the external power supply first, or else the iPad will not mount the drive.

Fig 24 300x400 Tutorial: how to connect external HDD to Apple iPad

IMG 0079 21 300x400 Tutorial: how to connect external HDD to Apple iPad

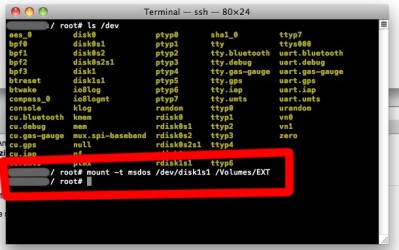
16. Now, lets go back to terminal. Type:

ls /dev

What you’re looking for here is the file “disk1s1″. If that does not show up, try steps 15-16 again. If you see “disk1s1″, proceed to step 17.

17. For a FAT32 formatted drive, type the following, into terminal:

Fig 26 399x250 Tutorial: how to connect external HDD to Apple iPad

mount -t msdos /dev/disk1s1 /Volumes/EXT

It will take a few seconds, and then return you to the command prompt. For an HFS drive, type the following:

mount -t HFS /dev/disk1s1 /Volumes/EXT

18. You are now good to go! You can now access the files in either iFile, or GoodReader. As an example of how to manipulate the files, watch the video below.

19. To unmount the drive, type the following, in Terminal:

umount /dev/disk1s1

20. That’s all!

Here is a video demonstration:

Many thanks to Max Sha!

iPhoneFolders iPhone Folder: an application to browse iPhone in Windows Explorer

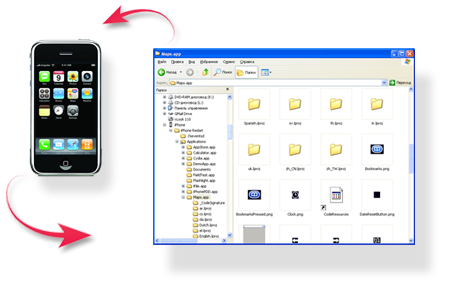
iPhone Folders is a Windows Explorer extension that allows you to browse contents of your iPhone or iPod Touch like a regular removable drive. After installation you’ll find it in My Computer folder.

Using this extension you can browse your phone filesystem, copy files to and from it, open files directly from iPhone, create shortcuts to folders on iPhone. In thumbnail mode program will display previews of png and jpg files on phone, application icons for installed applications (.app folders).

Compatible with x86 editions of Windows XP, Vista, 7 and x64 editions of Windows XP and Vista. Requires iTunes 8 or 9 for normal operation. Supports jailbroken and non-jailbroken phones (in the later case filesystem access is limited to Media folder).

You can download iPhone Folders version 1.0.31 here.

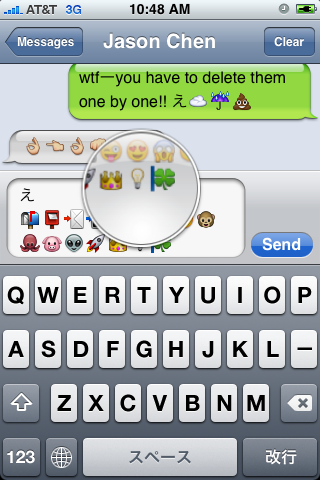
itsemojiohyes Get Emoji Icons for free

First of all these icons can be viewed on any iPhone with 2.2 firmware. But to be able to send these icons users need to perform additional actions. There are 4 ways to turn them on and 2 of them are free:

Solution N1 for $5.99:

In AppStore buy and install Touch Dial Emoji. Goto Settings -> Touch Dial -> Enable Smiley icon ON. Launch Touch Dial. Go to Settings -> General -> Keyboard -> International Keyboards -> Japanese and enable “Emoji.”

Solution N2 for $0.99:

In AppStore buy and install FrostyPlace. Play with the app for a minute to activate, click on a story, etc. Go to Settings -> General -> Keyboard -> International Keyboards -> Japanese and enable “Emoji.”

Solution N3 for Free:

Jailbreak your iPhone. Run Cydia and install Emoji application (iSpazio repository). Go to Settings -> General -> Keyboard -> International Keyboards -> Japanese and enable “Emoji.”

This application adds boolean ‘true’ key KeyboardEmojiEverywhere edits in /User/Library/Preferences/com.apple.Preferences.plist. You can do it manually if you want.

Solution N3 for Free:

Step 1. Download the vcard.vcf here.
Step 2. Import it to your address book program. If you are using Windows, you may want to do it on iPhone directly. Send the vcard.vcf file to yourself. Open in on iPhone’s Email.app, click the vcf file and import all the contacts.
Step 3. Go into “Settings” > “General” > “Keyboard” > “Japanese Keyboard”. Enable the QWERTY keyboard.
Step 4. In notes or any other program you want. Type “emojia”, “emojii” or “emojiu” to select those :) icons.

I like Solution N3. It is free and simple. You do not need to play with contacts and etc. But you need to jailbreak an iPhone.