бесплатно | Jailbreak iPhone, iPod Touch, iPad Skip to content

Jailbreak iPhone, iPod Touch, iPad

новости про джейлбрейк iPhone, iPod Touch и iPad

Archive

Tag: бесплатно

The evad3rs have released new Evasi0n7 1.0.6. The updated jailbreak tool version allows to hack the devices running latest iOS 7.0.6. Looks like you don’t have to wait or search for alternative patches as I recommended yesterday. All you need to do is to upgrade to iOS 7.0.6 and then run the Evasi0n7 tool.

evasion 1.0.6 released 500x190 Evad3rs Release Evasi0n7 1.0.6 for iOS 7.0.6

According iDownloadBlog,

Following Apple’s release yesterday of iOS 7.0.6, the evad3rs have released an update to their evasi0n7 jailbreak tool. The update, which brings the tool to version 1.0.6. included a fix for an SSL connection verification issue, which turned out to be a major security flaw in the operating system.

Before jailbreaking your iPhone, iPod touch or iPad, make sure you backed up all the important files from your device.

One can download Evasi0n7 1.0.6 from the official website. As always, it is available for free.

A new tweak has recently appeared on Cydia that lets you use your iPhone 5 or iPod touch to capture slow motion videos, even though these devices are believed to not support a slow motion mode. The tweak is called Slo-mo Mod and it is available for free on BigBoss repo.

Slo mo Mod 500x374 Capture Slow Motion Videos Using Slo mo Mod   New Cydia Tweak

As noted by iDownloadBlog,

One of the iPhone 5s’ flagship features, the Camera app’s baked-in slow motion mode, is now available to owners of older devices like the iPhone 5, and the iPod touch 5th generation. Slo-mo Mod is the jailbreak tweak that makes it so that slow motion mode is no longer an iPhone 5s exclusive.

The tweak can be customized and configured via Settings app. That means you can either turn Slo-mo Mod on or off or try to change some parameters to make the tweak work more efficient.

So, if you want to capture slow motion videos using your iPhone 5, iPhone 4s or iPod touch, Slo-mo Mod is definitely a worth downloading tweak.

Good news for all those who miss iOS 6 -- there’s a new tweak on Cydia that brings back the old school unlock sound. It is compatible with iPhones and iPads running iOS 7 and I must admit it works just perfect. It’s name is UnlockSound7.

unlocksound7 500x238 UnlockSound7: Tweak that Brings Back Old School Unlock Sound

Guys from iDownloadBlog and Jeff Benjamin in particular were among the first to spot the tweak on BigBoss repo. Here’s what they write about it and here’s the video they made, showing how UnlockSound7 works:

UnlockSound7 is a new jailbreak tweak that allows users to regain the iPhone’s iconic unlock sound that occurs when unlocking the device. Take a look at our video walkthrough to see how it works.

httpvh://youtu.be/CYoeJhfKT3w

As I mentioned above, the tweak is available on Cydia’s BigBoss repository. It’s free, so go and get it.

semi restore 500x387 Semi Restore Lets You Wipe Your iPhone Without Losing Your Jailbreak

Semi-Restore is a new solution for iPhone, iPad, and iPod touch users who want to wipe their device clean without losing their jailbreak.

Created by CoolStar, the process will restore your device running iOS 5.0 through 6.1.2 to near stock condition. It’s performed using a simple one click app that is available to download for Mac, Windows, and Ubuntu.

What this does do
● Uninstalls all Cydia packages
● Fixes host file issues
● Erases all user data
● Fixes permissions
● Fixes activation issues
● Fixes iMessage/Facetime issues
● Fixes Safe mode issues randomly appearing
● Reinstalls Cydia (in case it was deleted)

What this does not do
● Upgrade your iOS Version
● Downgrade your iOS Version
● Jailbreak your iOS Device
● Fix broken System Files

Notes:
● SemiRestore supports Windows XP SP3 or higher, OS X 10.6 or higher, and Ubuntu 12.10 or higher (or the equivalent Linux).
● There may be a better way to fix your current problem. For example, to fix “Safe Mode” issues, you can just uninstall Mobile Substrate from Cydia.
● Like any other restore, make sure you backup your data if you want it later.
● Avoid using your iOS device or anything related to iTunes or XCode during the Semi-Restore. Why not actually go outside?
● This process can not and does not repair broken system files! Avoid all Siri Ports, as they are not only illegal (except for Spire on 5.0.1) but they also create problems and may potentially break system files (even Spire can cause this).
● Your device will respring or reboot several times during the Semi-Restore. This is perfectly normal, so don’t panic.

You can download Semi-Restore from official site here.

http://www.youtube.com/watch?v=4YKohT-Ifb4

[via iclarified]

jail Paid iOS 5.1.1 untethered jailbreak released for A4 Devices [Video]

InteVyDis has released an untethered jailbreak for A4 devices on iOS 5.1.1 as part of Vulndisco Mobile 1.7. The module is vd_ios_untether_5_1_1. It works by creating a custom bundle you have to install via RedSn0w. Evgeny Legerov posted in twitter:

vulndisco mobile 1.7 is out with untethered 5.1.1

This jailbreak is not free and costs big money. It works only on A4 devices -- iPhone 3GS, iPhone 4, iPad 1, iPod Touch 3G and iPod Touch 4G. It is not yet tested by other hackers. So this might be fake. However famous hacker I01nc notes that the company is a legit source of exploits:

@legerov runs a company: Intevydis that sell exploit packs for many years. If that JB were fake he would hurt his own business.

The unfortunate thing is that now two sets of exploits may be revealed to Apple and some people may pay for the expensive exploit pack despite it being available free in a few days from pod2g.

MuscleNerd tweets:

the most troublesome part is that (potentially) close to 2x as many exploits will be burned now with 2 A4 JBs.

We recommend that you wait the extra day or two for a free jailbreak from pod2g that should work on all devices.

Here is a video demo of this jailbreak.

gevey ultra 51 300x300 Apple N Berry recalls Gevey Ultra 5.1, it does not work for iPhone 4 any more

The GEVEY Ultra 5.1 for the GSM iPhone 4 has been recalled since it used Loktar Sun’s free method (aka SAM unlock) to unlock your device which has been disabled by Apple. Apple N Berry is offering a full refund to customers who purchased the device. You can read their official statement here.

Hackers and users all around the world are amazed, that Apple N Berry was selling free stuff for $50. Here is @sherif_hashim comment on twitter:

unacceptable mistake on @applenberry ’s side, selling FREE loktar_sun server bug for $50 :( , http://www.applenberry.com/blog/gevey-ultra-recall/ , real scam!!!

183 HowTo bring the screen lock switch back to iPad iOS 4.2

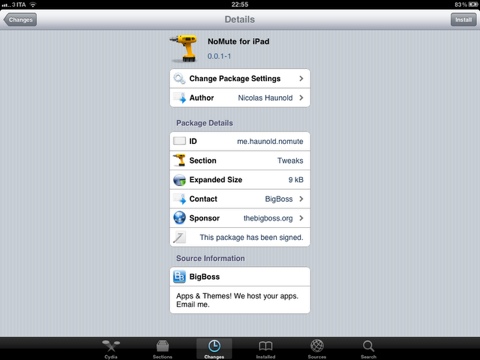
In iPad OS 4.2 ‘Orientation Lock’ was changed to ‘Mute Switch’. If you want to change it back there is an app for that.

NoMute, a jailbreak only application, switches the controversial mute switch from iPad 4.2 into its former (and more useful) orientation lock. The plugin is free and you can get it from the BigBoss repository on Cydia.

no mute HowTo bring the screen lock switch back to iPad iOS 4.2

By the way you can lock screen orientation without jailbreaking through multitasking panel – just push Home button twice, slide to the left and hit lock icon.

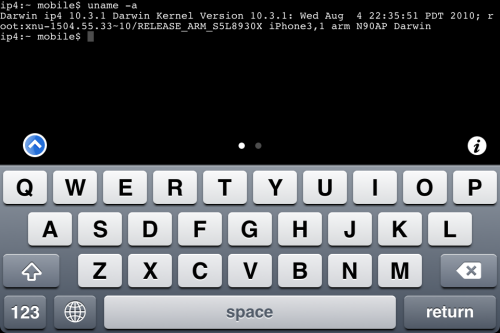
MobileTerminal iPhone4 04 500x333 Step By Step Tutorial: How to install MobileTerminal on iPhone with iOS 4.x

MobileTerminal is a terminal emulator application for the iPad and iPhone. The version of MobileTerminal that is available in Cydia doesn’t work with iPhone iOS 4.x. However there are beta versions that do work, but aren’t on Cydia because they are still in beta stages. This tutorial will show you step-by-step how to install MobileTerminal on iPhone with iOS 4.x (tutorial for iPad is here). If you have old version of MobileTerminal installed – uninstall it in Cydia (Search – MobileTerminal – Remove).

First of all you need to jailbreak your iPhone. If you have not done it already here is an easy tutorial: how to jailbreak iOS 4.0-4.1 on iPhone using Limera1n. After you successfully jailbreaked iPhone:

  1. Run Cydia by tapping on Cydia icon
  2. cydia icon Step By Step Tutorial: How to install MobileTerminal on iPhone with iOS 4.x

  3. The Cydia will start:

Read the rest of this entry

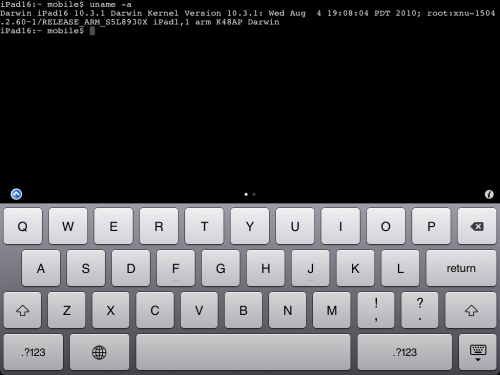
MobileTerminal iPad 05 500x375 Step By Step Tutorial: How to install MobileTerminal on Apple iPad

MobileTerminal is a terminal emulator application for the iPad and iPhone. The version of MobileTerminal that is available in Cydia doesn’t work with iPad iOS 3.2.2 and iPhone iOS 4.x. However there are beta versions that do work, but aren’t on Cydia because they are still in beta stages. This tutorial will show you step-by-step how to install MobileTerminal on iPad (tutorial for iPhone is here). If you have old version of MobileTerminal installed – uninstall it in Cydia (Search – MobileTerminal – Remove).

First of all you need to jailbreak your iPad. Here is an easy tutorial: how to jailbreak iPad with iOS 3.2.2 using Limera1n. After you successfully jailbreaked iPad:

  1. Run Cydia by tapping on Cydia icon
  2. cydia icon Step By Step Tutorial: How to install MobileTerminal on Apple iPad

  3. The Cydia will start:

Read the rest of this entry

IMG 0079 21 300x400 Tutorial: how to connect external HDD to Apple iPad

iPad USB Camera Connection Kit is much more useful as it seems. Max Sha, an experienced user, was able to access external hard drive with this kit. All you need is a jailbroken iPad, an external drive, a split-USB cable to give the drive some power and a terminal of some sort (f.e. MacBook) to mount the external storage. While it is a little unwieldy, it shows that Terabytes of external storage for iPad is possible.

Here is a complete step-by-step guide from Max Sha:

For starters, you will need to do the following:

1. Have an external hard drive formatted to either HFS or FAT32. NOTE: All data will be erased!

2. Perform the Spirit Jailbreak.

3. In Cydia, install iFile ($4.00 for full version, but there is also a free trial) and OpenSSH (free)

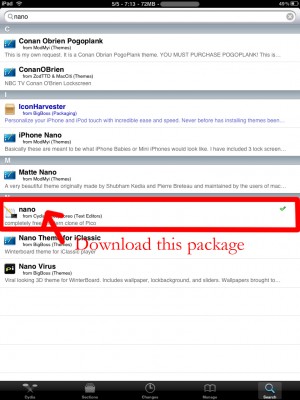
4. As well, install the “Nano” terminal text edit from Cydia.

Fig 5 300x400 Tutorial: how to connect external HDD to Apple iPad

5. For this particular example Max used GoodReader app for iPad ($0.99).

Now you can begin the process of mounting your hard drive. You will need external power for the drive. If you have an external drive with power (one that has a USB port and an external power supply) you won’t need to worry about this. If you have external drive with just an USB cord you will need a split USB cord.

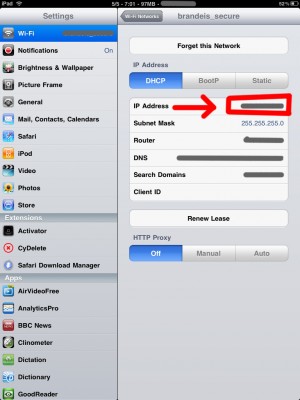
1. Open “Settings” on your iPad to find your IP address (make sure you’re on the same network as your iPad).

Fig 9 300x400 Tutorial: how to connect external HDD to Apple iPad

2. Open Terminal, on your Mac (/Applications/Utilities/Terminal.app). On Windows you can use Putty.

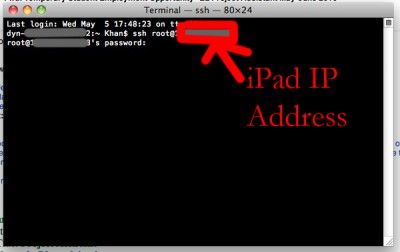
3. At the prompt, SSH into your iPad with the IP address you found in the “Settings” app (make sure OpenSSH is installed!), with the following:

ssh root@[iPad IP address]

Fig 10 400x252 Tutorial: how to connect external HDD to Apple iPad

For you first time users, the password for your root account will be “alpine”. NOTE: Please change your password ASAP. To do this, once you’ve logged in VIA Terminal, type the following into the command prompt:

passwd root

You will then be prompted for a new password. Please do the same for your “mobile” user as well, by doing the following:

passwd mobile

4. Now, type the following, in Terminal:

mkdir /Volumes
mkdir /Volumes/EXT
ln -s /Volumes/EXT /var/mobile/EXT
nano /var/stash/Applications.xxxxxx/iFile.app/Info.plist (“xxxxxx” is a series of numbers after “Applications”. If you type “/var/stash/Applications” and hit the “Tab” key, it will fill in the rest for you).

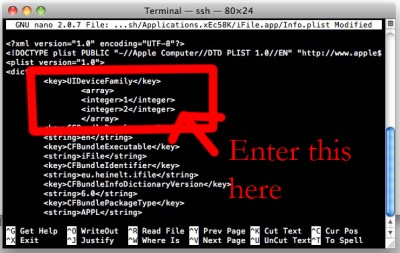
5. The nano text editor will now open. Please add the following lines below the first “<dict>”, in the document (this makes iFile look much better on the iPad):

Fig 13 400x253 Tutorial: how to connect external HDD to Apple iPad

<key>UIDeviceFamily</key>
<array>
<integer>1</integer>
<integer>2</integer>
</array>

6. Then hit “Ctrl+x”. Followed by “Y”, and then “Enter”. This will save the changes that you made.

7. Now, reboot your iPad. You will notice that your SSH connection will have closed, in Terminal. Re-open terminal, when the iPad reboots, and follow steps 1-3 (without reseting the passwords again).

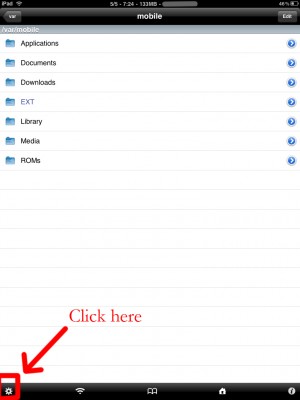
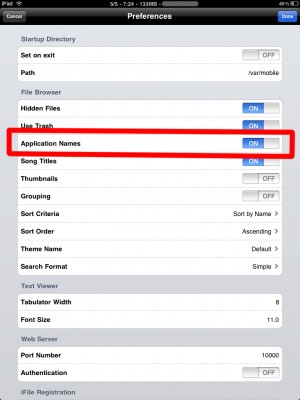
8. Open iFile, and go into the settings. It is recommended to have the settings set as shown below. The most important is enabling “Application Names”. Hit “Done”. Close out of iFile by hitting the Home button. Restart iFile.

Fig 15 300x400 Tutorial: how to connect external HDD to Apple iPad

FIG 16 300x400 Tutorial: how to connect external HDD to Apple iPad

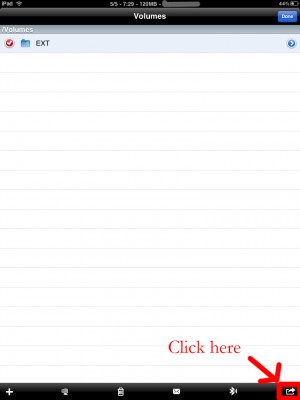
9. In iFile, navigate to “/Volumes/”. Then, select the “Edit” button, in the top right.

10. Check the circle next to the “EXT” folder you created in “Step 4″.

11. Click the “Box with an arrow”, in the bottom right. In the dialogue box that opens, select “Copy/Link”.

Fig 19 300x400 Tutorial: how to connect external HDD to Apple iPad

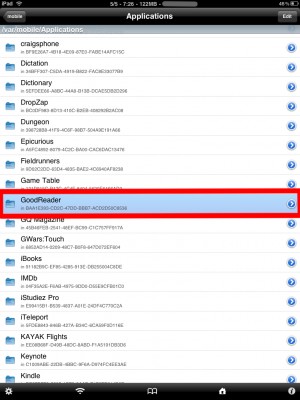
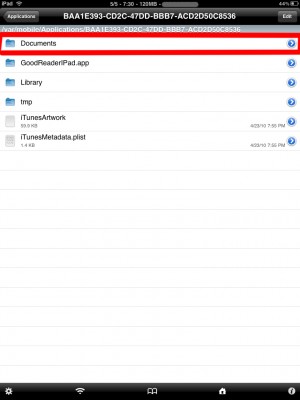
12. In iFile, Navigate to “var/mobile/Applications/”. You should now see the names of applications above the actual folder names. Navigate to the “GoodReader” folder, then the “Documents” folder.

Fig 20 300x400 Tutorial: how to connect external HDD to Apple iPad

Fig 21 300x400 Tutorial: how to connect external HDD to Apple iPad

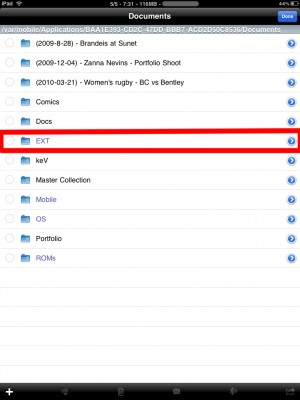
13. Click the “Edit” button again. And then click the “Box with an arrow”, in the bottom right. Click the “Create Link” button. You should now see the “EXT” folder. Hit “Done” in the upper right.

Fig 22 300x400 Tutorial: how to connect external HDD to Apple iPad

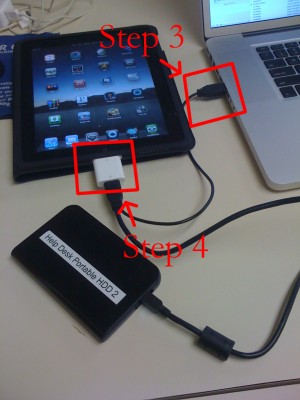
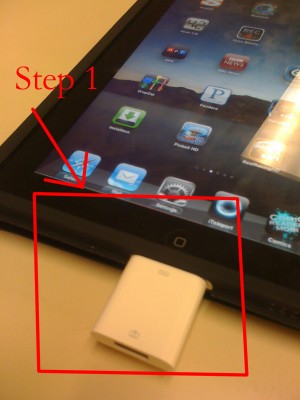
14. Now, connect your iPad Camera Connection Kit.

Fig 23 300x400 Tutorial: how to connect external HDD to Apple iPad

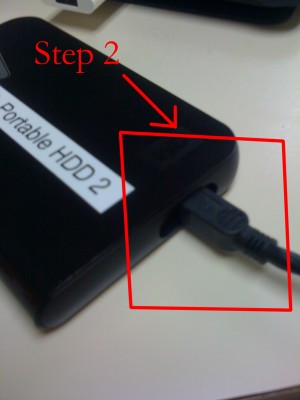
15. Take your hard drive and plug the secondary port into a power supply (in this case, Macbook Pro). Then, plug the main USB port into the iPad. You may see a message similar to “Insufficient power to mount this drive” error message on the iPad. With an external power supply, it should be much more convenient. NOTE: You MUST plug in the external power supply first, or else the iPad will not mount the drive.

Fig 24 300x400 Tutorial: how to connect external HDD to Apple iPad

IMG 0079 21 300x400 Tutorial: how to connect external HDD to Apple iPad

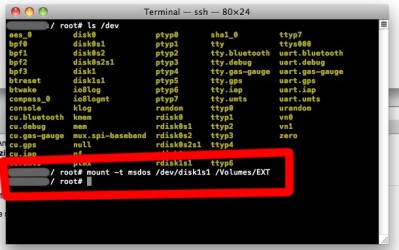
16. Now, lets go back to terminal. Type:

ls /dev

What you’re looking for here is the file “disk1s1″. If that does not show up, try steps 15-16 again. If you see “disk1s1″, proceed to step 17.

17. For a FAT32 formatted drive, type the following, into terminal:

Fig 26 399x250 Tutorial: how to connect external HDD to Apple iPad

mount -t msdos /dev/disk1s1 /Volumes/EXT

It will take a few seconds, and then return you to the command prompt. For an HFS drive, type the following:

mount -t HFS /dev/disk1s1 /Volumes/EXT

18. You are now good to go! You can now access the files in either iFile, or GoodReader. As an example of how to manipulate the files, watch the video below.

19. To unmount the drive, type the following, in Terminal:

umount /dev/disk1s1

20. That’s all!

Here is a video demonstration:

Many thanks to Max Sha!