Applications | Jailbreak iPhone, iPod Touch, iPad - Part 2 Skip to content

Jailbreak iPhone, iPod Touch, iPad

новости про джейлбрейк iPhone, iPod Touch и iPad

Archive

Tag: applications

Jay Freeman, better known as Saurik, the creator of Cydia, was interviewed by the home radio Make It Work. He speaks about the history and the future of the iPhone jailbreak.
saurik interview 400x222 Saurik talks about the iPhone jailbreak

Saurik describes the origins of Jailbreak and Unlock for the very first model of the iPhone. Jay explains that initially there were two important things to do with the iPhone 2G -- to use other carrier than AT&T and to install any application.

He continues discussing the main applications from Cydia. Cycorder was the first to allow video recording, and Winterboard was the only one that allowed users to change the graphical interface of the iPhone. He also speaks about Comex, the hacker who is currently working with the Dev Team for releasing and Unlock for the iPhone 4. According to Saurik the tool is still not ready to be released to the public due to severe bugs in the code. Here the second part:
IMG 0079 21 300x400 Tutorial: how to connect external HDD to Apple iPad

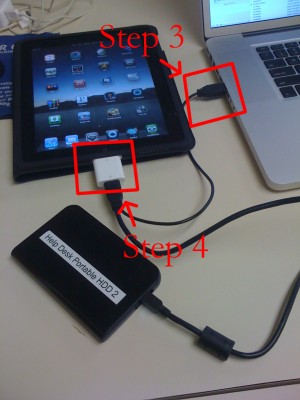
iPad USB Camera Connection Kit is much more useful as it seems. Max Sha, an experienced user, was able to access external hard drive with this kit. All you need is a jailbroken iPad, an external drive, a split-USB cable to give the drive some power and a terminal of some sort (f.e. MacBook) to mount the external storage. While it is a little unwieldy, it shows that Terabytes of external storage for iPad is possible.

Here is a complete step-by-step guide from Max Sha:

For starters, you will need to do the following:

1. Have an external hard drive formatted to either HFS or FAT32. NOTE: All data will be erased!

2. Perform the Spirit Jailbreak.

3. In Cydia, install iFile ($4.00 for full version, but there is also a free trial) and OpenSSH (free)

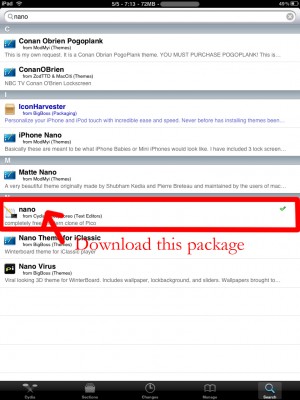
4. As well, install the “Nano” terminal text edit from Cydia.

Fig 5 300x400 Tutorial: how to connect external HDD to Apple iPad

5. For this particular example Max used GoodReader app for iPad ($0.99).

Now you can begin the process of mounting your hard drive. You will need external power for the drive. If you have an external drive with power (one that has a USB port and an external power supply) you won’t need to worry about this. If you have external drive with just an USB cord you will need a split USB cord.

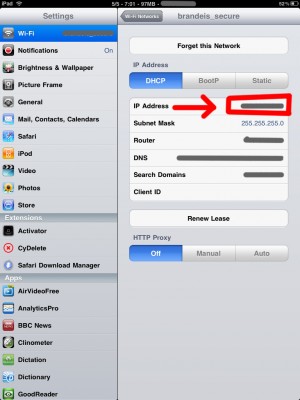
1. Open “Settings” on your iPad to find your IP address (make sure you’re on the same network as your iPad).

Fig 9 300x400 Tutorial: how to connect external HDD to Apple iPad

2. Open Terminal, on your Mac (/Applications/Utilities/Terminal.app). On Windows you can use Putty.

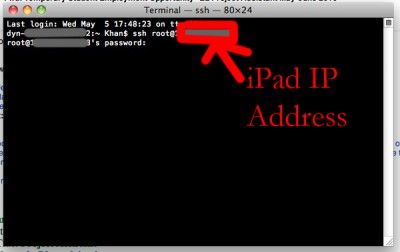
3. At the prompt, SSH into your iPad with the IP address you found in the “Settings” app (make sure OpenSSH is installed!), with the following:

ssh root@[iPad IP address]

Fig 10 400x252 Tutorial: how to connect external HDD to Apple iPad

For you first time users, the password for your root account will be “alpine”. NOTE: Please change your password ASAP. To do this, once you’ve logged in VIA Terminal, type the following into the command prompt:

passwd root

You will then be prompted for a new password. Please do the same for your “mobile” user as well, by doing the following:

passwd mobile

4. Now, type the following, in Terminal:

mkdir /Volumes
mkdir /Volumes/EXT
ln -s /Volumes/EXT /var/mobile/EXT
nano /var/stash/Applications.xxxxxx/iFile.app/Info.plist (“xxxxxx” is a series of numbers after “Applications”. If you type “/var/stash/Applications” and hit the “Tab” key, it will fill in the rest for you).

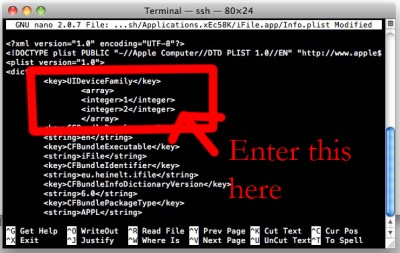
5. The nano text editor will now open. Please add the following lines below the first “<dict>”, in the document (this makes iFile look much better on the iPad):

Fig 13 400x253 Tutorial: how to connect external HDD to Apple iPad

<key>UIDeviceFamily</key>
<array>
<integer>1</integer>
<integer>2</integer>
</array>

6. Then hit “Ctrl+x”. Followed by “Y”, and then “Enter”. This will save the changes that you made.

7. Now, reboot your iPad. You will notice that your SSH connection will have closed, in Terminal. Re-open terminal, when the iPad reboots, and follow steps 1-3 (without reseting the passwords again).

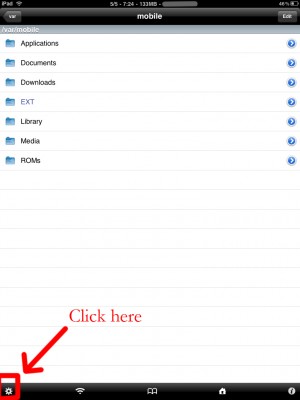
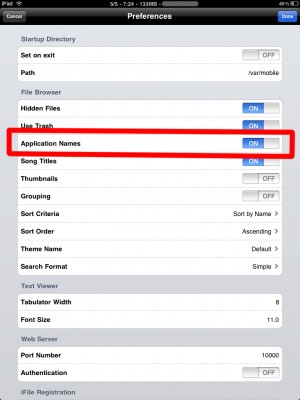
8. Open iFile, and go into the settings. It is recommended to have the settings set as shown below. The most important is enabling “Application Names”. Hit “Done”. Close out of iFile by hitting the Home button. Restart iFile.

Fig 15 300x400 Tutorial: how to connect external HDD to Apple iPad

FIG 16 300x400 Tutorial: how to connect external HDD to Apple iPad

9. In iFile, navigate to “/Volumes/”. Then, select the “Edit” button, in the top right.

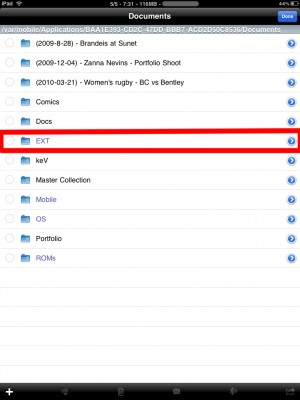
10. Check the circle next to the “EXT” folder you created in “Step 4″.

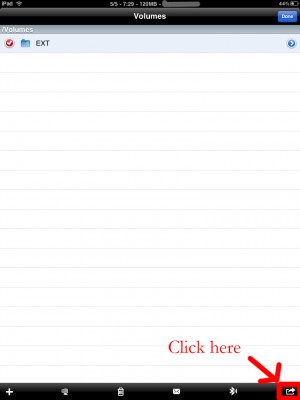
11. Click the “Box with an arrow”, in the bottom right. In the dialogue box that opens, select “Copy/Link”.

Fig 19 300x400 Tutorial: how to connect external HDD to Apple iPad

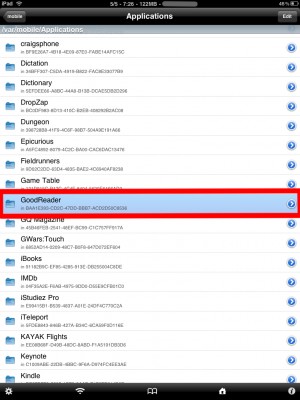
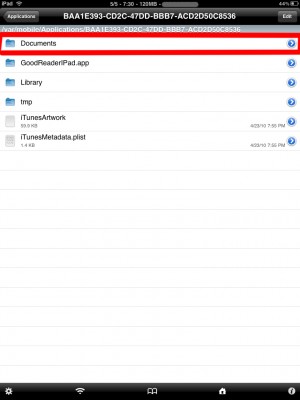
12. In iFile, Navigate to “var/mobile/Applications/”. You should now see the names of applications above the actual folder names. Navigate to the “GoodReader” folder, then the “Documents” folder.

Fig 20 300x400 Tutorial: how to connect external HDD to Apple iPad

Fig 21 300x400 Tutorial: how to connect external HDD to Apple iPad

13. Click the “Edit” button again. And then click the “Box with an arrow”, in the bottom right. Click the “Create Link” button. You should now see the “EXT” folder. Hit “Done” in the upper right.

Fig 22 300x400 Tutorial: how to connect external HDD to Apple iPad

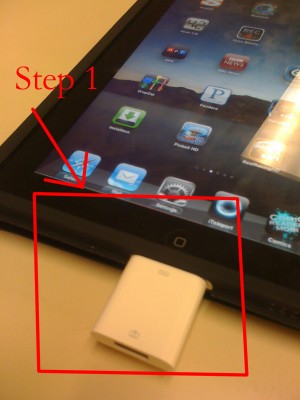
14. Now, connect your iPad Camera Connection Kit.

Fig 23 300x400 Tutorial: how to connect external HDD to Apple iPad

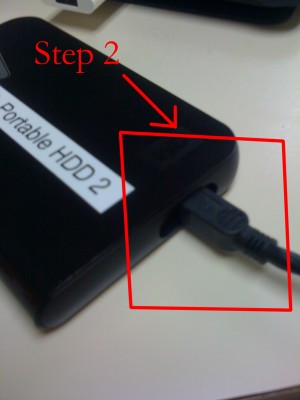
15. Take your hard drive and plug the secondary port into a power supply (in this case, Macbook Pro). Then, plug the main USB port into the iPad. You may see a message similar to “Insufficient power to mount this drive” error message on the iPad. With an external power supply, it should be much more convenient. NOTE: You MUST plug in the external power supply first, or else the iPad will not mount the drive.

Fig 24 300x400 Tutorial: how to connect external HDD to Apple iPad

IMG 0079 21 300x400 Tutorial: how to connect external HDD to Apple iPad

16. Now, lets go back to terminal. Type:

ls /dev

What you’re looking for here is the file “disk1s1″. If that does not show up, try steps 15-16 again. If you see “disk1s1″, proceed to step 17.

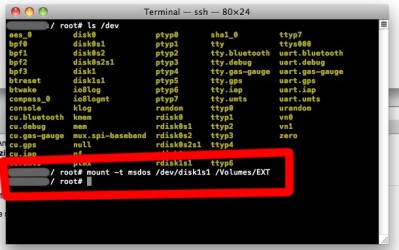
17. For a FAT32 formatted drive, type the following, into terminal:

Fig 26 399x250 Tutorial: how to connect external HDD to Apple iPad

mount -t msdos /dev/disk1s1 /Volumes/EXT

It will take a few seconds, and then return you to the command prompt. For an HFS drive, type the following:

mount -t HFS /dev/disk1s1 /Volumes/EXT

18. You are now good to go! You can now access the files in either iFile, or GoodReader. As an example of how to manipulate the files, watch the video below.

19. To unmount the drive, type the following, in Terminal:

umount /dev/disk1s1

20. That’s all!

Here is a video demonstration:

Many thanks to Max Sha!

A few hours ago iH8sn0w posted a tweet that he is able to run jailbreak on the new firmware 4.0 beta 1. DarkMalloc, another developer who worked on the project, has just released new video that shows firmware 4.0 jailbreak on iPhone 3G:

The interesting thing, besides the presence of Cydia and MobileTerminal, is the possibility to have multiple applications open at once. That means that multitasking on iPhone 3G can be enabled. Officially Apple doesn’t want to activate this functionality on iPhone 3G, just iPhone 3GS and later devices.

Defensive By Design

It is known, that iPad has a restrictive DRM shackles, which makes Apple the only available supplier of software for this device. So if you buy an iPad, you will have to download software only from the Apple’s AppStore. Yes, there is a big possibility of jailbreaking the gadget within the first 48 hours after its shipping since it’s based on the already jailbroken OS iPhone, but still this is not the best way of downloading applications for most of the people.

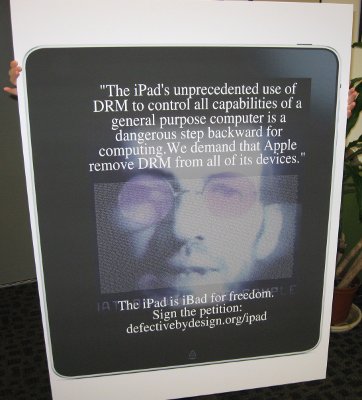
There are people, who disagree with a DRM-based strategy of software distribution. Some of them created an Anti-DRM group named Defective by Design. They told us they created an online petition that has been signed for 8,800 times since its inception 4 days ago. DbD has already sent off their first 5,000 signatures in the form of a giant postcard, which is in the photo above.

DbD’s operations manager John Sullivan says their main target is to get Apple to remove DRM and DRM enforcement from all its media and software. This is especially valuable for the iPad designed to be widely used by non-technical people who might not be aware of DRM.

- What Apple is doing with software is quite different. This is a scary step … as Apple move towards this model in the future,

said Sullivan.

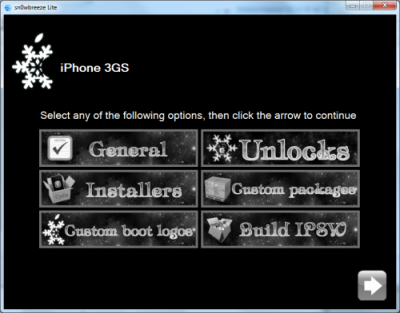
sn0wbreeze 400x313 Utility Sn0wBreeze beta released (PwnageTool for Windows)

iH8Sn0w has released a beta of Sn0wbreeze a software utility which jailbreaks the iPod Touch 1G, 2G and iPhone 2G, 3G, and 3GS (old bootrom & non MC). The software runs on Windows XP, Vista, 7 (32 or 64 bit). Sn0wbreeze is similar to PwnageTool for Mac. It will allow you to create custom ipsws which can be built to include Cydia applications and personalized boot logos.

At this time BlackRa1n is still recommended for Windows users with firmware 3.1.2 and RedSn0w for earlier firmwares.

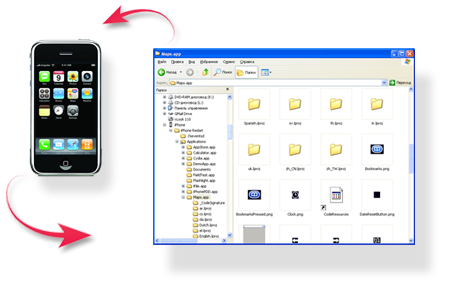
iPhoneFolders iPhone Folder: an application to browse iPhone in Windows Explorer

iPhone Folders is a Windows Explorer extension that allows you to browse contents of your iPhone or iPod Touch like a regular removable drive. After installation you’ll find it in My Computer folder.

Using this extension you can browse your phone filesystem, copy files to and from it, open files directly from iPhone, create shortcuts to folders on iPhone. In thumbnail mode program will display previews of png and jpg files on phone, application icons for installed applications (.app folders).

Compatible with x86 editions of Windows XP, Vista, 7 and x64 editions of Windows XP and Vista. Requires iTunes 8 or 9 for normal operation. Supports jailbroken and non-jailbroken phones (in the later case filesystem access is limited to Media folder).

You can download iPhone Folders version 1.0.31 here.

We have seen a video from Verizon named iDon’t and an ansfer from iPhone fans – the video named iDon’t Care. Here’s a new one, called iCan. It describes what a jailbreaked iPhone can do:

Here is the list of apps for that:

  • Can be customized: using Winterboard
  • I can run applications simultaneously: thanks to Backgrounder and Kirikae
  • I can always use the tethering: thanks to the tweaks available in Cydia
  • I call with Skype on 3G network: using VoiceOver3G or 3GUnrestrictor
  • Support an open development: with applications to be released via Cydia

Nice, isn’t it?

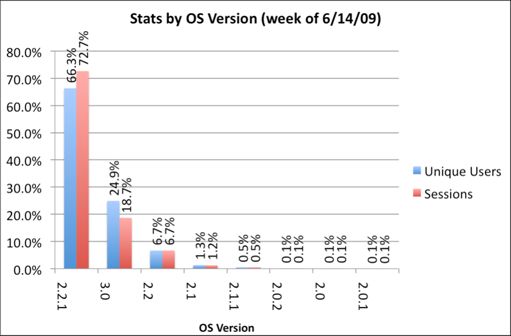
We just posted statistics from AdMob about firmwares on iPhones and iPods. Here are the numbers from another company – PinchMedia. This company deals with monitoring the use of applications.

The results below show that:

  • most users (66%) use firmware 2.2.1,
  • only 1 of 4 users installed the new 3.0 firmware,
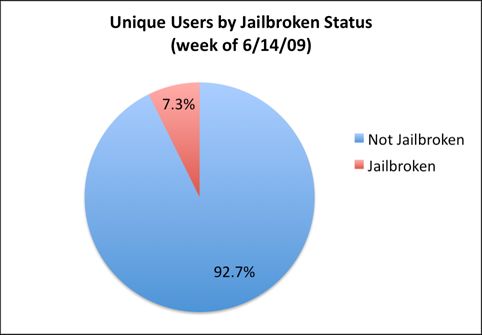
  • 7.3% of iPhone and iPod Touch owners performed jailbreak.

pinchmedia stats Jailbreak and firmware stats from PinchMedia

pinchmedia stats jailbreak Jailbreak and firmware stats from PinchMedia

img 0154 266x400 Clippy updated to 0.97 2 [Cydia]

Clippy is an iPhone addition from Cydia for copy/paste functionality. It was updated to version 0.97-2. The main bug that was fixes is a crash of different applications such as Notes, Safari, Mail and others where the animation was drawn. New version also added a language pack, improved the animation of the menu, full support for selecting editable text in web views, themes support and a lot more.

Avaliable via Cydia for jailbreaked iPhones.

Full changelog for 0.97 updates:


Read the rest of this entry »

iphone pirate 2 243x300 DevTeam about firmware 2.2

DevTeam says that 2.2 update SHOULD NOT be applied using iTunes if you want the chance of a soft-unlock in the near future. Use new version of PwnageTool (not avaliable yet, but will be soon).

Some fact:

  • The 2.2 firmware for 3G contains a baseband update for the 3G iPhone
  • The 2.2 firmware for 2G (1st gen iPhones) doesn’t contain a baseband update and the baseband is still at 04.05.04
  • Pwnage technique (and therefore the Jailbreak) isn’t affected, but PwnageTool and QuickPwn do not support this release as yet, so DO NOT install 2.2 using iTunes as you will lose your jailbreak
  • If you apply this update and you previously relied on PwnageTool or QuickPwn to activate your phone, it may become temporarily deactivated and unusable (until we release the new version of PwnageTool or QuickPwn).
  • PwnageTool and QuickPwn updates will be released as soon as possible that will allow a safe update path to 2.2 the release of these updates is inevitable but not imminent, we are creating the modifications right now and we need to put the new software through the usual testing process.
  • If you apply this update and you have third-party (non AppStore) applications from Cydia and Installer that you rely on they will stop working.
  • 2G (1st gen) iPhone users who cannot wait for the new PwnageTool or QuickPwn can safely “Update” to 2.2 using iTunes, this will preserve the existing activation. However “restoring” to 2.2 using iTunes will return the iPhone to the unactivated state. If you are in any doubt just wait. NB: This works for 2G ONLY.
  • The use of SIM-Proxies (small circuit boards/chips that sit underneath the SIM card) to provide GSM/UMTS service on your locked iPhone 3G: early reports suggest that the 2.2 update disables the functionality of these devices.