Error | Jailbreak iPhone, iPod Touch, iPad - Part 3 Skip to content

Jailbreak iPhone, iPod Touch, iPad

новости про джейлбрейк iPhone, iPod Touch и iPad

Archive

Tag: error

itunes Prevent iTunes from Updating Jailbroken Devices

iTunes continues to serve iOS updates even if your Apple’s device was jailbroken. And if these updates are downloaded and installed occasionally, your device may be returned to  a non-jailbroken state.  Here the script, which prevents iTunes from automatically downloading updates:

#!/bin/bash
clear
echo “This script will chmod the download locations for Firmware Files, So iTunes can not download firmware.”
echo “AKA it will prevent iTunes from auto updating your device.”
echo “”
echo “”
echo “To restore firmware just hold down option and manually select the firmware file.”
echo “”
clear
echo “Made By: Wesley K”
echo “wesley@wesleyk.me”
echo “http://wesleyk.me”
echo “http://wesleyk.me/twitter
sleep 2
read -sn 1 -p “Press any key to continue…”
clear
echo “Now I need your password to continue”
echo “Killing iTunes now”
sudo -v
sudo killall -9 iTunes
sleep 2
clear

echo “Im going to make all the folder needed to future proof a few things”
echo “If errors occur here, No big deals.”
sudo mkdir ~/Library/iTunes/iPad Software Updates/
sudo mkdir ~/Library/iTunes/iPod Software Updates/
sudo mkdir ~/Library/iTunes/iPhone Software Updates/
sleep 2
clear

echo “I am going to dump all the current files in your update folders.”
echo “This will prevent any updates from downloaded firmware.”
sudo rm -rf ~/Library/iTunes/iPad Software Updates/*
sudo rm -rf ~/Library/iTunes/iPhone Software Updates/*
sudo rm -rf ~/Library/iTunes/iPod Software Updates/*
sleep 2
clear

echo “Now preventing iTunes from downloading new firmwares.”
sudo chmod 444 ~/Library/iTunes/iPad Software Updates
sudo chmod 444 ~/Library/iTunes/iPod Software Updates
sudo chmod 444 ~/Library/iTunes/iPhone Software Updates
sleep 2
clear

echo “Made By Wesley K”
echo “Give me credit if you use it”
echo “For safe measures I would run this script after iTunes updates, It shouldn’t affect it but I don’t know yet.”

To use it, just copy and paste the script into TextEdit: TextEdit → Format →  Plain Text. Save the file wherever you want as blockitunesupdates.sh. Open up a terminal window and type chmod +x filepath, where filepath is the path to the script. To start it, drag the script file into a Terminal window, push Enter, and follow the instructions.

If you update iTunes, OS X, or repair disk permissions with Disk Utility, you may need to perform the above described procedure again to make sure iTunes stays blocked. If you want to lock the script, replace the three 444s in the script with 555 and run it again.

FixFacebookforiPhone3.2Problem 200x300 How to Fix Facebook for iPhone 3.2Facebook for iPhone 3.2 was released last night and now it supports the newly created function “Places”, background downloading of photos and videos in iOS 4, together with other visual enhancements, such as “pull-to-refresh” for the iPhone. However, for many users, this new version was mostly broken, with the following error “Unable to load the page” on most of its pages. Yes, and if you try to uninstall and reinstall the application, it simply refuses to “Log in”.

As it turned out, this problem occurs on jailbroken iPhones for those users who have installed the application BiteSMS from Cydia. The new Facebook application for iPhone 3.2 is not compatible with the current version of BiteSMS. So if you have installed this application, removing it from Cydia, you’ll solve this problem, at least it really helped some of the users.

We hope that the new version of BiteSMS will be released pretty soon and will be compatible with this new version of Facebook for iPhone.

iphone activate HowTo activate iPhone without original SIM card

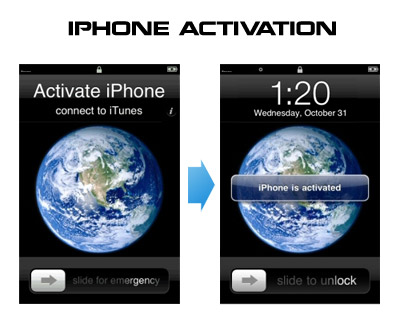
Having problems activating your iPhone? Don’t have original SIM-card? Cannot get passed emergency unlock screen? We have a solution:

If you have iPhone 3G, just use redsn0w to jailbreak and hactivate. If you have iPhone 3GS or iPhone 4 follow these instructions:

If you are already Jailbroken:

So you have an iPhone with iOS 4.0, but don’t have the original SIM and stuck on the Emergency Call Screen:

  1. Download ifunbox software (download link)
  2. Run ifunbox software and sync with phone
  3. Go to /private/var/root/Library/, delete original lockdown folder and put this lockdown folder after you extract it from the zip file
  4. Restart phone

If you are not jailbroken

Sherif Hashim discovered that you can activate your iPhone 4, iPhone 3GS or even iPhone 3G without the original carrier SIM card. You need a “phonebook sim card” or 02 simcard. You can buy these type of sim at radioshack, bestbuy or other mobile electronics store (for example here).

Once you get passed the Emergency Call screen, connect to Wifi, jailbreak using JailbreakMe.com and unlock using ultrasn0w. Once that is complete you should be passed activation and unlocked (able to use any sim). If you get a different simcard error, do the following final step:

  1. Download ifunbox software (download link)
  2. Run ifunbox software and sync with phone
  3. Go to /private/var/root/Library/, delete original lockdown folder and put this lockdown folder after you extract it from the zip file
  4. Restart phone

If you have itunes invalid response problem:

  1. Connect to wifi and ssh to your phone (via winscp, putty, terminal, etc).
  2. Navigate to your lockdown folder (/private/var/root/Library/).
  3. Delete pair_records folder
  4. Reconnect the cable and see that your invalid response problem is gone.

If you bought your iPhone 4 on ebay you will need the official sim (at&t) or a universal sim, like ones you can grab at bestbuy for $10 this will get you passed Emergency Screen.

via jailbreakmatrix and gsmhosting

IMG 0079 21 300x400 Tutorial: how to connect external HDD to Apple iPad

iPad USB Camera Connection Kit is much more useful as it seems. Max Sha, an experienced user, was able to access external hard drive with this kit. All you need is a jailbroken iPad, an external drive, a split-USB cable to give the drive some power and a terminal of some sort (f.e. MacBook) to mount the external storage. While it is a little unwieldy, it shows that Terabytes of external storage for iPad is possible.

Here is a complete step-by-step guide from Max Sha:

For starters, you will need to do the following:

1. Have an external hard drive formatted to either HFS or FAT32. NOTE: All data will be erased!

2. Perform the Spirit Jailbreak.

3. In Cydia, install iFile ($4.00 for full version, but there is also a free trial) and OpenSSH (free)

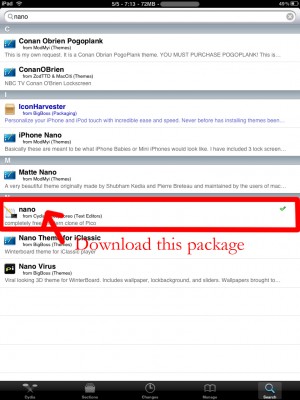
4. As well, install the “Nano” terminal text edit from Cydia.

Fig 5 300x400 Tutorial: how to connect external HDD to Apple iPad

5. For this particular example Max used GoodReader app for iPad ($0.99).

Now you can begin the process of mounting your hard drive. You will need external power for the drive. If you have an external drive with power (one that has a USB port and an external power supply) you won’t need to worry about this. If you have external drive with just an USB cord you will need a split USB cord.

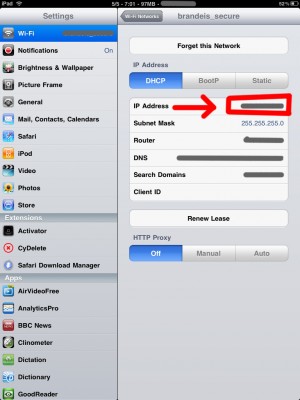
1. Open “Settings” on your iPad to find your IP address (make sure you’re on the same network as your iPad).

Fig 9 300x400 Tutorial: how to connect external HDD to Apple iPad

2. Open Terminal, on your Mac (/Applications/Utilities/Terminal.app). On Windows you can use Putty.

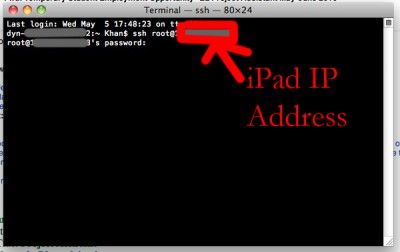
3. At the prompt, SSH into your iPad with the IP address you found in the “Settings” app (make sure OpenSSH is installed!), with the following:

ssh root@[iPad IP address]

Fig 10 400x252 Tutorial: how to connect external HDD to Apple iPad

For you first time users, the password for your root account will be “alpine”. NOTE: Please change your password ASAP. To do this, once you’ve logged in VIA Terminal, type the following into the command prompt:

passwd root

You will then be prompted for a new password. Please do the same for your “mobile” user as well, by doing the following:

passwd mobile

4. Now, type the following, in Terminal:

mkdir /Volumes
mkdir /Volumes/EXT
ln -s /Volumes/EXT /var/mobile/EXT
nano /var/stash/Applications.xxxxxx/iFile.app/Info.plist (“xxxxxx” is a series of numbers after “Applications”. If you type “/var/stash/Applications” and hit the “Tab” key, it will fill in the rest for you).

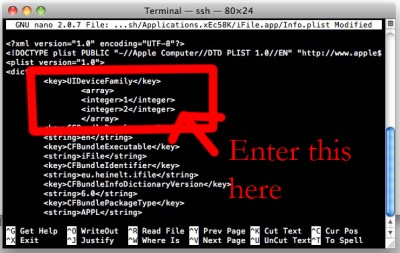
5. The nano text editor will now open. Please add the following lines below the first “<dict>”, in the document (this makes iFile look much better on the iPad):

Fig 13 400x253 Tutorial: how to connect external HDD to Apple iPad

<key>UIDeviceFamily</key>
<array>
<integer>1</integer>
<integer>2</integer>
</array>

6. Then hit “Ctrl+x”. Followed by “Y”, and then “Enter”. This will save the changes that you made.

7. Now, reboot your iPad. You will notice that your SSH connection will have closed, in Terminal. Re-open terminal, when the iPad reboots, and follow steps 1-3 (without reseting the passwords again).

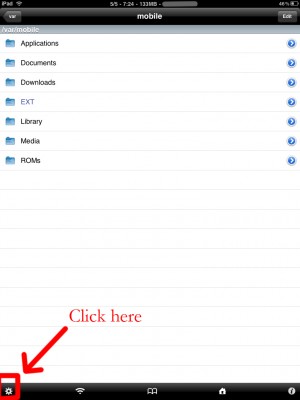
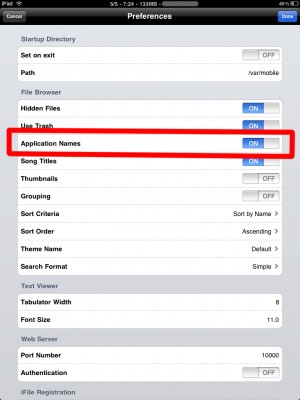
8. Open iFile, and go into the settings. It is recommended to have the settings set as shown below. The most important is enabling “Application Names”. Hit “Done”. Close out of iFile by hitting the Home button. Restart iFile.

Fig 15 300x400 Tutorial: how to connect external HDD to Apple iPad

FIG 16 300x400 Tutorial: how to connect external HDD to Apple iPad

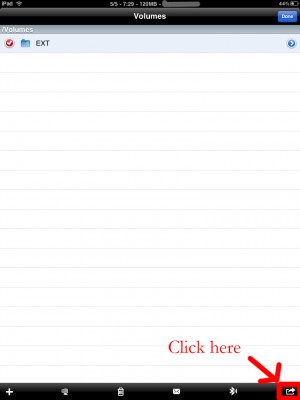
9. In iFile, navigate to “/Volumes/”. Then, select the “Edit” button, in the top right.

10. Check the circle next to the “EXT” folder you created in “Step 4″.

11. Click the “Box with an arrow”, in the bottom right. In the dialogue box that opens, select “Copy/Link”.

Fig 19 300x400 Tutorial: how to connect external HDD to Apple iPad

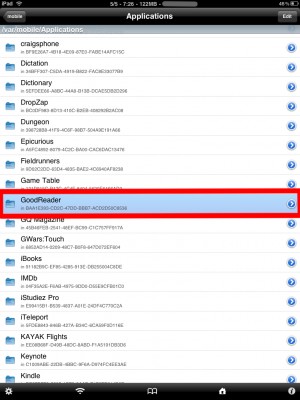
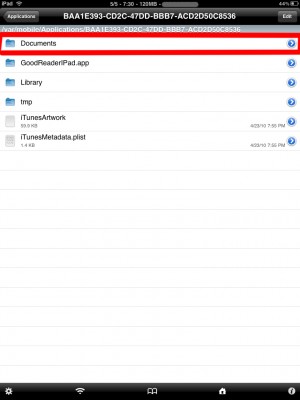
12. In iFile, Navigate to “var/mobile/Applications/”. You should now see the names of applications above the actual folder names. Navigate to the “GoodReader” folder, then the “Documents” folder.

Fig 20 300x400 Tutorial: how to connect external HDD to Apple iPad

Fig 21 300x400 Tutorial: how to connect external HDD to Apple iPad

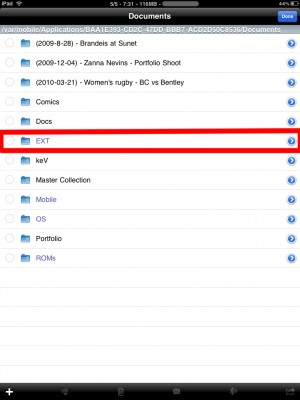
13. Click the “Edit” button again. And then click the “Box with an arrow”, in the bottom right. Click the “Create Link” button. You should now see the “EXT” folder. Hit “Done” in the upper right.

Fig 22 300x400 Tutorial: how to connect external HDD to Apple iPad

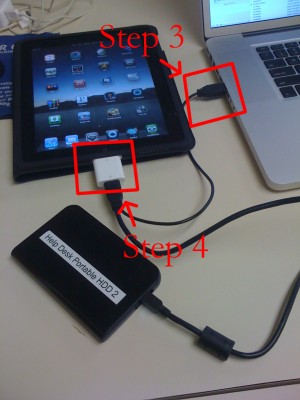
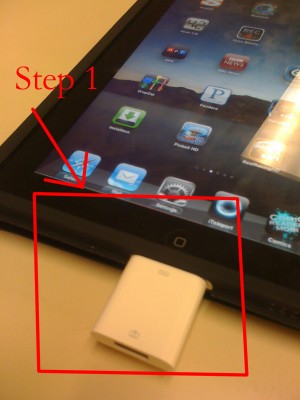
14. Now, connect your iPad Camera Connection Kit.

Fig 23 300x400 Tutorial: how to connect external HDD to Apple iPad

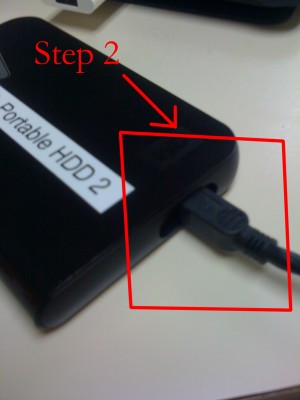
15. Take your hard drive and plug the secondary port into a power supply (in this case, Macbook Pro). Then, plug the main USB port into the iPad. You may see a message similar to “Insufficient power to mount this drive” error message on the iPad. With an external power supply, it should be much more convenient. NOTE: You MUST plug in the external power supply first, or else the iPad will not mount the drive.

Fig 24 300x400 Tutorial: how to connect external HDD to Apple iPad

IMG 0079 21 300x400 Tutorial: how to connect external HDD to Apple iPad

16. Now, lets go back to terminal. Type:

ls /dev

What you’re looking for here is the file “disk1s1″. If that does not show up, try steps 15-16 again. If you see “disk1s1″, proceed to step 17.

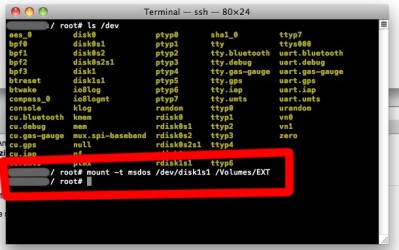
17. For a FAT32 formatted drive, type the following, into terminal:

Fig 26 399x250 Tutorial: how to connect external HDD to Apple iPad

mount -t msdos /dev/disk1s1 /Volumes/EXT

It will take a few seconds, and then return you to the command prompt. For an HFS drive, type the following:

mount -t HFS /dev/disk1s1 /Volumes/EXT

18. You are now good to go! You can now access the files in either iFile, or GoodReader. As an example of how to manipulate the files, watch the video below.

19. To unmount the drive, type the following, in Terminal:

umount /dev/disk1s1

20. That’s all!

Here is a video demonstration:

Many thanks to Max Sha!

cydia Saurik Improves Cydia Speeds

This is good news for for those who use Cydia, an alternative to Apple’s AppStore for jailbreaked iPhones and iPod Touches. Saurik has uploaded a new version of APT that has an optimized cache generator and greatly improves Cydia performance:

“I also uploaded a new version of APT I’ve been working on: it has an optimized cache generator and more error tolerant repository parsing.”

When launching Cydia the next time you will find updates for some APT packages (up to 3 depending on what you have installed). Perform the install and enjoy the speed improvements!

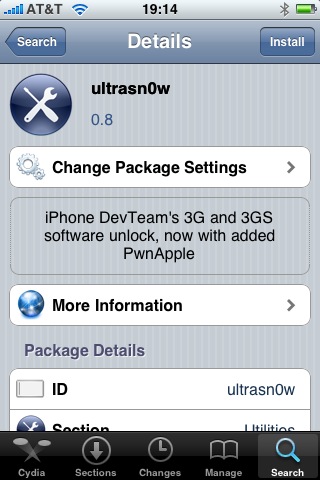
ultrasn0w 0 8  Ultrasn0w 0.8: now unlock for iPhone 3GS

Great news for all iPhone 3GS users. DevTeam updated ultrasn0w, software that unlocks iPhone with firmware 3.0. Now it supports iPhone 3GS!

Avaliable in Cydia, repo: repo666.ultrasn0w.com

Here are quick instructions:

  1. Ensure you have firmware 3.0
  2. Jailbreak your iPhone using redsn0w (this will also install Cydia)
  3. Run Cydia
  4. Please add the repo repo666.ultrasn0w.com to Cydia. That last “o” is actually the number zero “0”! If you use the letter “o” you’ll get an error.
  5. Search for ‘ultrasn0w’ in cydia or icy and install ultrasn0w
  6. Reboot your iPhone 3G
  7. T-Mobile USA users should disable 3G before using ultrasn0w
  8. Enjoy
  9. If you have any problems reset your network settings (it helped many users): Settings->General->Reset->Reset Network Settings

unlock Ultrasn0w: iPhone 3G Unlock for firmware 3.0 is ready

DevTeam released Ultrasn0wapplication that will unlock your iPhone 3G with firmware 3.0. Here are the instructions:

  1. Ensure you have upgraded to iPhone OS 3.0
  2. Jailbreak your iPhone using redsn0w (this will also install Cydia)
  3. Run Cydia
  4. Please add the repo repo666.ultrasn0w.com to Cydia. That last “o” is actually the number zero “0”! If you use the letter “o” you’ll get an error.
  5. Search for ‘ultrasn0w’ in cydia or icy and install ultrasn0w
  6. Reboot your iPhone 3G
  7. T-Mobile USA users should disable 3G before using ultrasn0w
  8. Enjoy

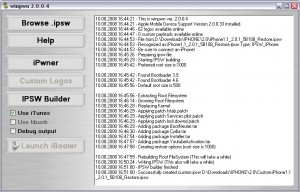
PwnageTool 2.0.2 released just a day ago. And now WinPwn – iPhone jailbreaker and unlocker for windows is avaliable. The main new feature – it supports firmware 2.0.1.

Download 2.0.0.4: [Rapidshare.com] [Rapidshare.de]

Download firmwares: iPhone 1.1.4, 2.0, 2.0.1, iPhone 3G 2.0, 2.0.1

winpwn2004 2 300x192 WinPwn 2.0.0.4 with support of 2.0.1 firmware

2.0.0.4 features:

  • Support for both 1.1.4, 2.0, 2.0.1
  • Root partition resize support
  • Installer support
  • Support for WinXP and Vista 32/64bit.

Notes are as usual:

  • You MUST do a full uninstall of winpwn before installing the new version
  • Make sure you have the latest version of iTunes (from 7.7)
  • WinPwn uses 300MB of ram at peak due to the ipsw being extracted in memory
  • You must first click browse and load an IPSW to use WinPwn (i thought this was clear)
  • For 2.0 only the *5A347_Restore.ipsw files are valid. The 345 image will not work
  • If you see Failed to load image catalog/payload catalog, this is fine and won’t cause problems
  • If you already have service with AT&T do not activate or install Youtube Fix
  • As usual jailbreak for iPhone and iPhone 3G, unlock only for iPhone.
  • It is recommended to use at least 550mb partition size to accommodate a space issue that causes some folks errors such as “the ipsw failed to create”.

How to:

  1. First create a custom IPSW using the IPSW Builder (original are here: iPhone 1.1.4, 2.0, 2.0.1, iPhone 3G 2.0, 2.0.1).
  2. Bootloader Images: 3.9 and 4.6 in it here or here.
  3. Click “Ipwner” and browse for the custom IPSW that you just created. This will pwn itunes and allow you to flash
  4. Custom IPSW files via DFU mode
  5. Once you have pwned Itunes, put your phone into DFU mode. If you don’t know how to do this click Here.
  6. Once you are in DFU mode Itunes will pop up and then you can hold shift and click restore and browse to your custom IPSW file.

pwnage PwnageTool 2.0.1 released

Yesterday there was a release of PWNage 2.0. Now version 2.0.1 is avaliable.

Here is the list of bugfixes:

  • It auto-finds the bl39 and bl46 files better, if they’re on your computer
  • It creates the ~/Library/iTunes/Device Support/ folder if not present, which should help with some 1600 errors people have been having.
  • Many people have reported the PwnageTool not starting up at all (the icon never stops bouncing). This issue should be resolved now.
  • The Sparkle AppCast URL is fixed in this version, so automatic updates should work for future releases.

Because of the AppCast URL fix, we recommend that everyone who downloaded PwnageTool 2.0 get this version, if they want to stay up to date automatically.

If PwnageTool 2.0 pwned your phone correctly the first time, you do not need to pwn again with 2.0.1.

The file can be found on BigBoss_’s repository, or at Hackint0sh.

If you choose to download it from other mirrors, you may want to verify that the SHA1 of the file is 10b6c7dc22286e7b70c3d5a92cda7d117426fda9.

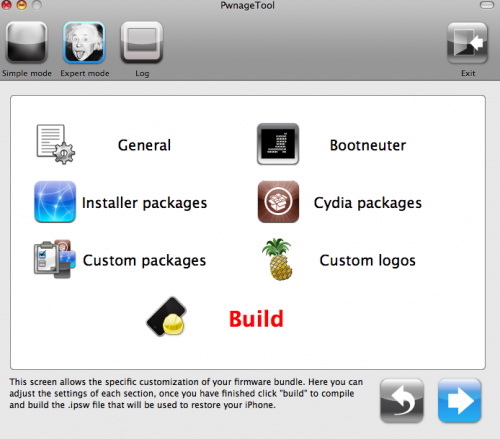
pwnage 20

Now older IPhone users users can upgrade to firmware 2.0 and IPhone 3G users have a possibility to have jailbreaked IPhones. That is because PwnageTool 2.0 is released today. Download links are: mirror1, mirror2, mirror3.

Just a reminder: this tool jailbreaks and unlocks older iPhones, and jailbreaks iPhone 3Gs and iPod Touches. No unlock for Iphone 3G yet. The supported firmware is 2.0 only. Platform is Mac OS.

If you get Error 1600 from iTunes (or if you see in your log a failure to repare x12220000_4_Recovery.ipsw), try: mkdir “~/Library/iTunes/Device Support” ;  if that directory already exists, remove any files in it.  Then re-run PwnageTool.

Reminder: as of right now, there are no apps out for 2.0. Over the next few days some will come out. So do not update yet if you have some favorite 1.1.x apps you are using! 2.0 will not run 1.1.4 apps

UPDATE: version 2.0.1 is avaliable