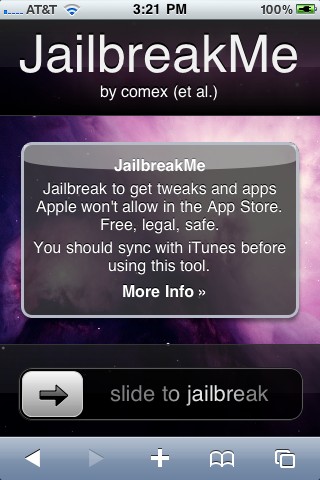
Here is the video of recently released universal safari jailbreak called JailBreakMe working on an iPhone 3G:
Here is the video of recently released universal safari jailbreak called JailBreakMe working on an iPhone 3G:
Jay Freeman, better known as Saurik, the creator of Cydia, was interviewed by the home radio Make It Work. He speaks about the history and the future of the iPhone jailbreak.
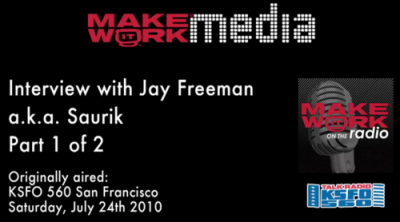
Saurik describes the origins of Jailbreak and Unlock for the very first model of the iPhone. Jay explains that initially there were two important things to do with the iPhone 2G -- to use other carrier than AT&T and to install any application.
He continues discussing the main applications from Cydia. Cycorder was the first to allow video recording, and Winterboard was the only one that allowed users to change the graphical interface of the iPhone. He also speaks about Comex, the hacker who is currently working with the Dev Team for releasing and Unlock for the . According to Saurik the tool is still not ready to be released to the public due to severe bugs in the code. Here the second part:

DevTeam hacker Planetbeing has just announced that the has been successfully unlocked.
Looks like I now have an unlocked iPhone 4.

My soft-unlocked iPhone 4 (in Canada). I’ll have video in a couple of hours once I can top-up the SIM. http://twitpic.com/24ycdv
DevTeam congratulated planetbeing in team’s official twitter:
Congrats to @planetbeing for first ever soft-unlocked iPhone4 http://is.gd/dqwvv (now to streamline it!)
Musclenerd also mentioned one interesting fact:
We think we have 3 different ways to unlock once inside BB (the 3rd way was first to fully work for @planetbeing !)
Congratulations for accomplishing this in such a short time. The unlock will be publicly available shortly after comex releases his jailbreak utility for iOS 4.

iH8Sn0w has successfully performed a tethered jailbreak for iPhone 3GS with new firmware iOS 4 and the new bootrom. Unfortunately this jailbreak requires users to have 3.1.2 SHSH blobs saved.
Alright… If anyone has their 3.1.2 SHSH blobs, NOT 3.1.3. Then I’ll see if I can produce a tool that will do this job…
Here is a video demo posted by AKinGdom1:
The utility will be available soon. Might be as soon as tomorrow.
Hacker msftguy created unofficial PwnageTool which allows to upgrade to the pre-release of iOS 4.0 GM while keeping your jailbreak and old baseband.
This is not an official release by Devteam, so we recommend to wait for the final versions of both iOS 4.0 and PwnageTool.
For the advanced users who want to experiment here is a .
Msftguy also provided a video:

iPad USB Camera Connection Kit is much more useful as it seems. Max Sha, an experienced user, was able to access external hard drive with this kit. All you need is a jailbroken iPad, an external drive, a split-USB cable to give the drive some power and a terminal of some sort (f.e. MacBook) to mount the external storage. While it is a little unwieldy, it shows that Terabytes of external storage for iPad is possible.
Here is a complete step-by-step guide from Max Sha:
For starters, you will need to do the following:
1. Have an external hard drive formatted to either HFS or FAT32. NOTE: All data will be erased!
2. Perform the Spirit Jailbreak.
3. In Cydia, install iFile ($4.00 for full version, but there is also a free trial) and OpenSSH (free)
4. As well, install the “Nano” terminal text edit from Cydia.

5. For this particular example Max used GoodReader app for iPad ($0.99).
Now you can begin the process of mounting your hard drive. You will need external power for the drive. If you have an external drive with power (one that has a USB port and an external power supply) you won’t need to worry about this. If you have external drive with just an USB cord you will need a .
1. Open “Settings” on your iPad to find your IP address (make sure you’re on the same network as your iPad).

2. Open Terminal, on your Mac (/Applications/Utilities/Terminal.app). On Windows you can use .
3. At the prompt, SSH into your iPad with the IP address you found in the “Settings” app (make sure OpenSSH is installed!), with the following:
ssh root@[iPad IP address]

For you first time users, the password for your root account will be “alpine”. NOTE: Please change your password ASAP. To do this, once you’ve logged in VIA Terminal, type the following into the command prompt:
passwd root
You will then be prompted for a new password. Please do the same for your “mobile” user as well, by doing the following:
passwd mobile
4. Now, type the following, in Terminal:
mkdir /Volumes
mkdir /Volumes/EXT
ln -s /Volumes/EXT /var/mobile/EXT
nano /var/stash/Applications.xxxxxx/iFile.app/Info.plist (“xxxxxx” is a series of numbers after “Applications”. If you type “/var/stash/Applications” and hit the “Tab” key, it will fill in the rest for you).
5. The nano text editor will now open. Please add the following lines below the first “<dict>”, in the document (this makes iFile look much better on the iPad):

<key>UIDeviceFamily</key>
<array>
<integer>1</integer>
<integer>2</integer>
</array>
6. Then hit “Ctrl+x”. Followed by “Y”, and then “Enter”. This will save the changes that you made.
7. Now, reboot your iPad. You will notice that your SSH connection will have closed, in Terminal. Re-open terminal, when the iPad reboots, and follow steps 1-3 (without reseting the passwords again).
8. Open iFile, and go into the settings. It is recommended to have the settings set as shown below. The most important is enabling “Application Names”. Hit “Done”. Close out of iFile by hitting the Home button. Restart iFile.


9. In iFile, navigate to “/Volumes/”. Then, select the “Edit” button, in the top right.
10. Check the circle next to the “EXT” folder you created in “Step 4″.
11. Click the “Box with an arrow”, in the bottom right. In the dialogue box that opens, select “Copy/Link”.

12. In iFile, Navigate to “var/mobile/Applications/”. You should now see the names of applications above the actual folder names. Navigate to the “GoodReader” folder, then the “Documents” folder.


13. Click the “Edit” button again. And then click the “Box with an arrow”, in the bottom right. Click the “Create Link” button. You should now see the “EXT” folder. Hit “Done” in the upper right.

14. Now, connect your iPad Camera Connection Kit.

15. Take your hard drive and plug the secondary port into a power supply (in this case, Macbook Pro). Then, plug the main USB port into the iPad. You may see a message similar to “Insufficient power to mount this drive” error message on the iPad. With an external power supply, it should be much more convenient. NOTE: You MUST plug in the external power supply first, or else the iPad will not mount the drive.


16. Now, lets go back to terminal. Type:
ls /dev
What you’re looking for here is the file “disk1s1″. If that does not show up, try steps 15-16 again. If you see “disk1s1″, proceed to step 17.
17. For a FAT32 formatted drive, type the following, into terminal:

mount -t msdos /dev/disk1s1 /Volumes/EXT
It will take a few seconds, and then return you to the command prompt. For an HFS drive, type the following:
mount -t HFS /dev/disk1s1 /Volumes/EXT
18. You are now good to go! You can now access the files in either iFile, or GoodReader. As an example of how to manipulate the files, watch the video below.
19. To unmount the drive, type the following, in Terminal:
umount /dev/disk1s1
20. That’s all!
Here is a video demonstration:
Many thanks to !

Finally the jailbreak for iPad, iPhone and iPod Touch from the Dev Team is available for download. It’s free and untethered and it’s called “Spirit”. The jailbreak supports every iDevice with firmware version 3.1.2, 3.1.3 or 3.2.
If you have iPhone 3GS or an iPad you should backup your SHSH blobs before using the jailbreak. ECID SHSH or SHSH blob is a unique signature given to every Apple mobile device. When you decide to restore the firmware on your iPhone, iPod Touch or iPad, Apple servers checks this signature.
As you know, if a new firmware is released it becomes impossible to restore the older firmware from iTunes. But Cydia creator tuned up a new server and now it mimics Apple’s verification server and saves your older SHSH blobs so that you can restore back your device to the older firmware. Without having your SHSH blobs saved you may accidentally update new firmware and then you not only lose your jailbreak but also won’t be able to restore the older firmware to re-jailbreak your device.
This is also important because there is a big possibility that Apple will soon find out what exploit is used by the jailbreak and then it will be patched in the form of new firmware.
You can save your SHSH blob in three ways. Here is a guide to make it using AutoSHSH.


If you have some problems with using AutoSHSH to save your blobs, write it in comments or try or instead.
Now, when you saved you SHSH blobs, you can make the jailbreak. It is recommended for you to sync your device with iTunes beforehand. Then use the following guide:
That’s all!
Additionally here is a video tutorial for jailbreaking:
Please note that Spirit is not a carrier unlock so it won’t allow you to use unauthorized wireless carriers. The jailbreak is also “sort of beta”, so it may be buggy. DevTeam notifies that some apps in Cydia that are NOT designed for iPad may crash your system and require you to restore so be careful.

Wow! Hours after iPad 3G sales launch and it has already been jailbroken! Below is a video of MuscleNerd where jailbroken iPad 3G runs Cydia.
MuscleNerd used the jailbreak called “Spirit”. It’s a tool that makes untethered unlock of iPad, iPod Touch 3G and iPhone 3GS and DevTeam promises it will be available soon. Stay tuned for further instructions how to save your SHSH Blobs and then use Spirit to jailbreak your device.